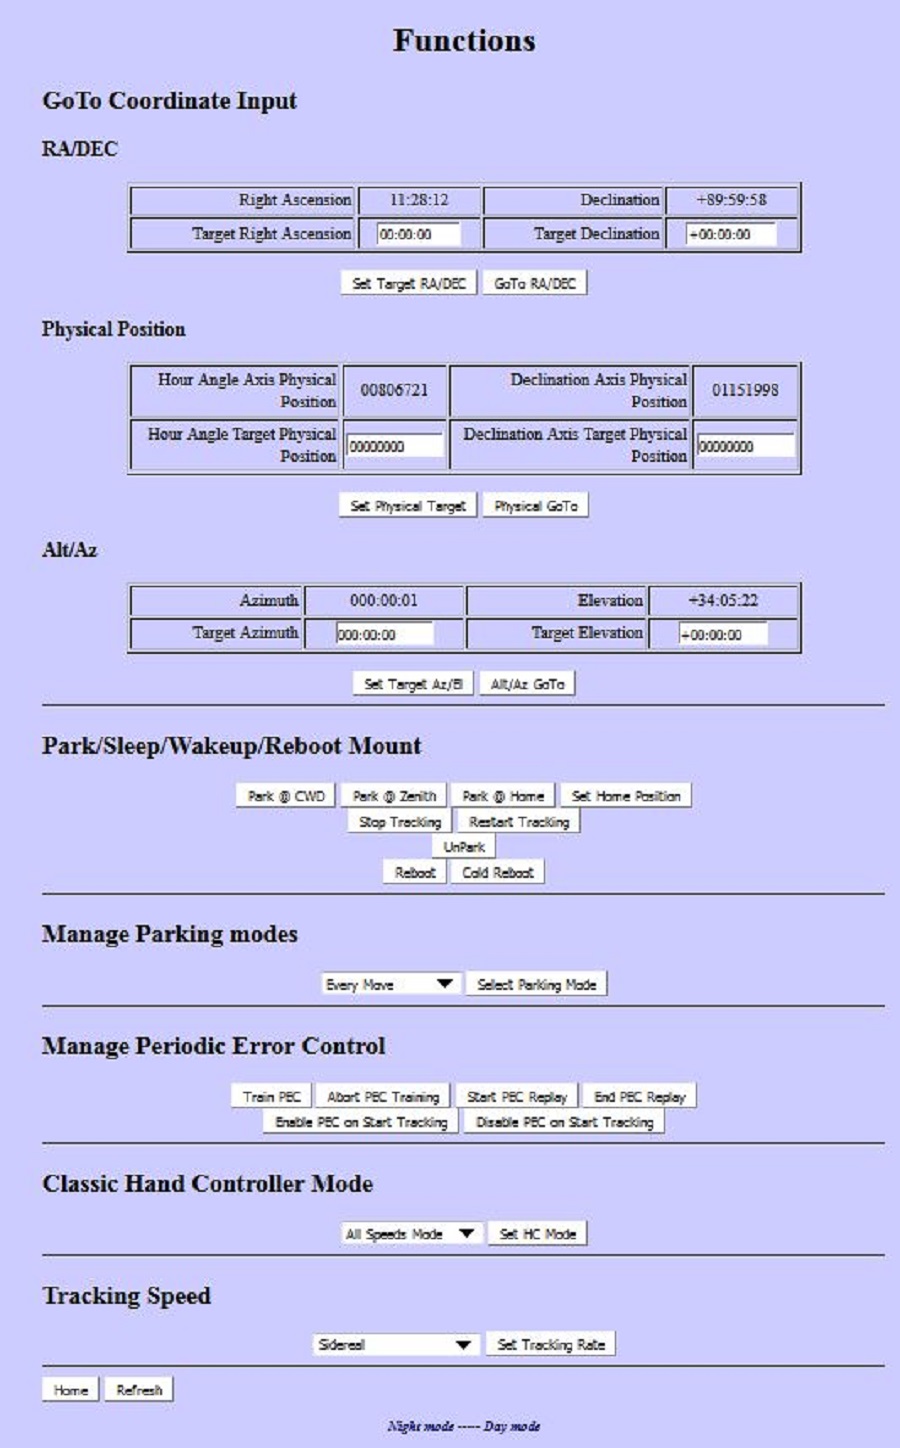
You can use it this page to:
- GoTo Coordinate Input - slew the mount to a specific location in
the sky by entering target Right ascension and target Declination.
Hit Set target RA/Dec to accept the setting and then GoTo RA/DEC to
slew the mount to these coordinates.
- Physical Position - you can set the mounts Physical Position of
the RA and Dec motors.
The numbers are motor encoder ticks in both axes. One can calculate
the total count for a circle by dividing 360 degrees * 60 minutes *
60 seconds (1,296,000 arc seconds for a full circle) by the step
resolution of the axis. At equatorial mount's CWD position the axes
are at the half of this physical position.
- Alt/Az - this is to set the Azimuth and elevation if you are in
the Alt/AZ mode of operation. It does not function in the Equatorial
mode of operation.
- Park/Sleep/wakeup/Reboot Mount.
- Park @ CWD - this will part the mount with the
counterweights down and the declination pointing to the
appropriate pole for the hemisphere the mount is in.
- Part @ Zenith - this will move the Declination to 90
degrees with the counterweights down.
- Park @ Home - this will move both axes to a predefined
position, set by using the Set Home Position button.
- Set Home Position - Set the mount to where ever you
want the Home position to be, then hit the Set Home Position
button.
- Stop Tracking - this should stop all tracking, in both the
Equatorial and Alt/AZ modes.
- Restart Tracking - this should start the tracking back in
the desired tracking rate.
- Reboot - this should start the mount from as if power was
just turned on. It will do which ever startup method
selected at the bottom of the mount page.
- Cold Reboot - This will do the same as above but do an
Cold start instead of what is selected at the bottom of the
mount page.
- Parking modes
defines how the mount and what rules the mount follows to perform an Un-Park. There are 3
different modes.
The rules are in
firmware after July 27, 2013
These modes can only be set on the Functions page of the web
interface or through serial command 92. Ascom Gemini.net
driver can set Park Mode 2.
- Every Move or Mode 0 - Every command that moves the mount wakes the
mount up (current state). This includes pressing the
directional buttons, changing the tracking rate, using any
of the Un-Park button. This is the default mode, and is the
only mode in firmware before July 27, 2013
- GoTo Commands or Mode 1 - HC directional buttons, classical HC and
AG inputs are ignored, but GoTo commands and un-park
commands wake it up.
- Explicit Wakeup or Mode 2 - Only a Un-Park command :hW# will wake the mount up.
This mode is there to provide compatibility with the ASCOM
standard rules. The Un-Park buttons in the hand
controller, Web interface, and the Un-Park command in the
ASCOM driver send this string to the mount. The ASCOM
driver now has a check box under Configuring Park, that will
select this mode of Operation. Please note that
parking or un-parking does not change from one mode to the
other.
- Manage Periodic Error - PEC - this is where you can:
- Train PEC - start the mount training the PEC curve.
You will normally use a guide scope to do this, and guider
inputs. You could use a cross-hair eye-piece and the hand
controller. Please note that the hand controller will only
let you move at guide speeds while the PEC training is working.
PEC training take some time, as the worm has to turn 1 complete
turn for a complete curve to be generated. Note: PEC is
only built for RA.
- Abort PEC training - this will stop the training and discard
the curve that was being stored.
- Start PEC replay - this starts applying the PEC curve to the
mount tracking.
- End PEC replay - this stops the PEC curve from being applied
to the mount tracking. The PEC curve is retained for future use.
- Enable PEC on Start Tracking. If PEC data is loaded,
the PEC will startup when tracking starts. Version 5.2 22
July 2015 or later main board firmware.
- Disable PEC on Start Tracking. Will disable the Start PEC
on start of tracking function. Version 5.2 22 July 2015 or later main board firmware.
- Classic Hand Controller Mode - This lets you select the mode
that the Classic Hand Controller will function in. This is an
optional Classic hand controller, that can be
plugged into the Classic hand controller jack. This hand
controller can be purchased from Losmandy. It is on there
replacement parts web page. I really recommend it.
It can also be used to test the Guider inputs.
- All Speeds Mode: This mode allows the classic hand
controller buttons to change the speed of the movement by
momentarily touching the opposite button. Each touch of
the opposite button will speed up the motor movement.
Guiding can also be accomplished in this mode.
- Photo Mode - this is the desired mode for guiding.
The opposite button touch speed up does not function in this
mode.
- Visual Mode - this is the same as the All Speeds mode,
except the mount cannot be guided with guider input either
through the guider input jack, or serial commands
- Tracking Speeds - This is where you can select the desired
default tracking speed. Please see the
definitions page
for a description of each tracking speed.
|
