Setup ASCOM for first time with either the Gemini-1 or Gemini-2.
Before doing the steps on these pages, please make sure you have set up all of the mount setting inside your Gemini-1 or Gemini-2. This includes time, date, "site name,"  latitude, longitude, "altitude in meters,"  "Time Zone Offset,"  "All three Limits," and mount type. Following the steps below will save all these setting to the default ASCOM profile file correctly.   You can also do these procedure's to update the Gemini.net Profile file anytime you change setting inside your Gemini-1 or Gemini-2.


Note: if the "Send Advanced Setting to Gemini on connect" checkbox is checked, on the Advanced Setting Page, and the profile file has never been saved, is corrupt or incorrect, then it can wipe out all your Gemini setting or change them to unknow values, when you hit the "Connect" button on the Gemini.net driver.  These instructions show how to correct this, and also how to set it up the first time before you "Connect".


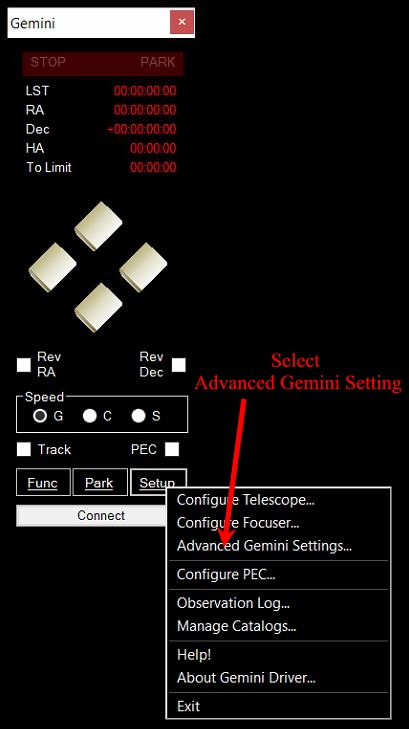
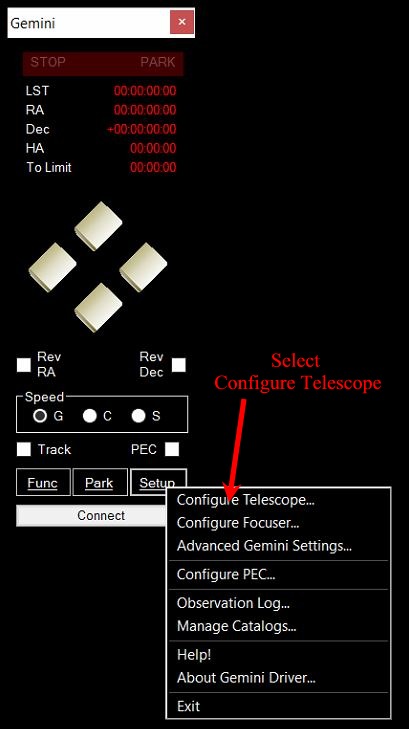
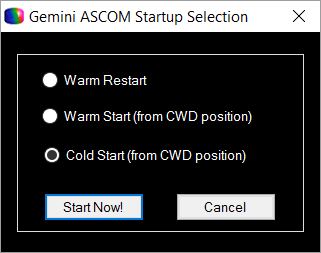
1. Please open up the Gemini.net ASCOM driver by clicking on the ICON that looks like the one on the left. The menu below should open up.


Fig 1.

1. Make sure you have not hit the "Connect" button.  It needs to be saying "Connect", not "Disconnect".

2. On the Menu, Right click on Setup and Select Advanced Gemini Setting. The below image should come up.  You may get an error message stating Communications Error. Just hit OK if you do. The error is caused because you have not connected to the mount yet. It is normal.

3.Goto the next image below.

NOTE: If you position your mouse cursor over the "hand control menu" (As show on the left) and hit "F1" it will bring up the Gemini.net ASCOM manual. (You will need a PDF reader for it.)


Fig 2.
1. Clear the "Send Advanced Setting to Gemini on Connect" checkbox at the bottom of the page.

2. Then Close the Form by Selecting OK in Lower Right.

3. Goto Next image


Fig 3.
1. Make sure you have not hit the "Connect" button.  It needs to be saying "Connect", not "Disconnect".

2. On the Menu, Right click on Setup and Select Config Telescope. The below image should come up.  

 3. Goto Next image


Fig 4.
1. Make sure  the two checkboxes in the picture are clear.

2. Then Close the Form by hitting OK in the Lower Right.

3. Goto Next image


NOTE: For Gemini-1 users please uncheck
"Precision Pulse Guide" as it does not work consistently for the Gemini-1.


Fig 5.
1. You will now select how to have the computer connect to the Gemini 1 or 2.
In a Gemini-1 this will need to be a com port number, such as Com 1.
In the Gemini-2 it can be a com port if using a serial input or a com port representing a virtual serial port that uses a USB port of the Gemini-2.
It can also be an Ethernet connection.

Please Note: if your selection is Ethernet then see this page then come back here.

2. Then Close the Form by hitting the OK in Lower Right of form.


3. Goto Next image


Fig 6.
1. Please hit the Connect button.  The ASCOM driver should try and connect to the Gemini,  If it does, then the Connect box should change to Disconnect.

2. If a boot mode such as Cold Start, Warm Start, or Warm restart has not already been selected, then the ASCOM will pop up a window asking you which one to start with.  You can select Cold Start if you wish, and then Start now


                              Fig 7.


3. Right mouse click on the "Setup" button and select "Advanced Gemini Setting" The below menu should come up.


Fig 8.
1. Hit the "From Gemini" Check-box.  This will bring all the setting from the Gemini into the ASCOM drivers.

2. Then hit the "Save Profile" button.  This will save all these setting to a Gemini default profile file. 

3.You can have that profile load if you wish every time that the ASCOM driver connects by checking the Select box  "Send Advanced Setting to Gemini on connect."  This will replace the setting in the Gemini with the ones in the saved profile.

4. You can now close the form by hitting the 'OK" button in the lower right.

         YOU ARE DONE!

Please note that the Gemini.net driver has a built in manual. Just hit F1 to bring it up. Your mouse cursor will need to be positioned over the hand controller menu.
Also note that anytime you change the Gemini setting inside the Gemini controller, then you might want to repeat these procedure's to update the Gemini.net Profile file.