Configuring Win 10 Win7, or XP for direct connection to PC using Static IP Address

This page will help you configure Win10, 8.1, 7, or XP
for using a network  directly connecting the Gemini 2 to a computers Ethernet port using a static IP address.  If you are connecting your Gemini-2 to a router, hub, or switch this not the page for you. See Connecting to Web interface of the Gemini-2. Note: If your laptop is not rated for 10/100/1000mhz ethernet connection (Called Gigi-Bit), you must use an crossover Ethernet cable.

This section is divided into 3 sections. The first is for Windows 10, second is Windows 7, last is for Windows XP

This Section is for Configuring Windows 10
Win 8.1 Should be very Similar.:
  1. You need to open up the Network control window.  Here is two methods to do that. a-d or e.
    1. You first need to access the taskbar at the bottom of the screen.


    2. Right mouse click on the network icon

    3. The Select Open Menu should come up.

    4. Mouse click on the "Open Network and Sharing center" this page should open.

Fig 2

e. An alternate method is Type Windows KEY+R. When the block comes up, type ncpa.cpl into it.  Goto Step 4.

  1. Mouse click or select the "Change adapter Setting" on the left side.
  2. If using a laptop, the a page very similar to this one should come up.

Fig 3


  1. Right Mouse Click in the one that says "Local Area Connection."  You should see this:

    Fig 4


  2. Select the "Properties" setting.  This should come up:

    Fig 5


  3. Move the mouse down to the "Internet Protocol 4 (TCP/IPv4) and select "Properties" at the bottom of the drop drown box.  This window should open:

    Fig 6


  4. Select the circle Left of "Use the following IP address" where the page should change to this (except the Items will be not filled in.)

    Fig 7

    Fig 8


  5. I suggest that you fill in the default IP address with 19.1.68.0.100  Note it cannot be any address that you presently use on your network.  It also should not be the 192.168.0.111 that is on the hand controller.  Every device on a network has to have it's own unique address.

  6. Fill the subnet mask in with 255.255.255.0

  7. Now fill the default gateway in with 192.168.0.1  Note this should be the base address of your network.  If you base address is 192.168.0.1 then that is what you will use. If you network uses something like 192.168.1.1 then use that.  Also change the IP address to match such as 192.168.1.100.  

  8. The Gemini-2 Default gateway address is going to have to match the one in step 13.  The Gemini-2 IP address will also have to be in the same network.  If the gateway is 192.168.1.1 then make the Gemini-2 IP address 192.168.1.111 for instant.

  9. You are going to want to make sure Netbios is working on your network. 

  10. Click the Advanced Box (see fig 7 above.) The below menu should come up.


    Fig 9


  11. Now click on the WINS tab.  The below menu should come up.


    Fig 10


  12. Now you have two choices here.  If the Default box is checked, and http://gemini/ will not bring up the Web Interface. Then Click the "Enable NetBios over TCP/IP" check box.  It the link works then leave the setting at default.  Hit the OK button and close out of each window in turn.

    This ends the Windows 10 configuration.


This Section is for Configuring Windows 7
Vista Should be very Similar.:
1. You need to get to the window shown in figure 1. This is the Network and Sharing Center.  You can get to it by clicking on the network icon (looks like a small computer screen) in the lower right side of the Taskbar (the taskbar is normally at the bottom of the main Windows screen) and select Open Network and Sharing center, or by clicking Start Balloon, select Network, then Network and Sharing center.
`
Fig 1 Click on image to see larger version
2. Click on "Change Adapter Setting" Fig 2 should open up.
In figure 2, you will see all the Network hardware devices you have. If your computer has just a wired connection you should see one similar to Fig 2, but with only one connection.  My laptop has 3 connections. One is a Ethernet hardware connection which is the first on on the top left. That is the one we will configure to work with the Gemini-2.

Fig 2 Click to see larger image
3.  If your computer has both a hardware and wireless connection you will see at least two devices. We are not interested in the one for the wireless network.
Right mouse click on the one for the hardware connection, it should not have the word wireless in it anywhere, and select Properties. The window shown in Fig 3 should appear.

Fig 3 Click on image it see larger version
4. Highlight the line that says "Internet Protocol Version 4 (TCP/IPv4)" and click "Properties" Figure 4 should appear. 

Fig. 4

Fig4A What the Gemini-2 is set to.
NOTICE: DHCP is UNCHECKED!
Use Menu-->Mount-->Network to get to this page.
5.  Note: it will have Obtain an IP address automatically selected more than likely.
  • We are going to change to "Use the following IP address" so select that.
  • The IP address box will now be un-grayed out.
  • Put in 192.168.0.100 (can be anything from 192.168.0.2 to 192.168.0.255 except 192.168.0.111 (If you do have a wireless connection also, do not use that IP address either, or any IP address of any of your other connected devices. All Devices connected via Ethernet must use there on distinct address.)
  • For the subnet put in 255.255.255.0
  • For the Default Gateway put in 192.168.0.1
  • Do not change any other setting and click "OK"
  • Close all the other windows.
  •  You should now be able to get to the Gemini by using either http://gemini or http://192.168.0.111


Please note that all of the instructions assumes that your base default gateway is 192.168.0.1. If you have a Router such as a NetGear, your base default gateway will probably be 192.168.1.1
If that is the case then you what to use that address as a base for all your setting. Such as:
  • Put in 192.168.0.100 (can be anything from 192.168.1.2 to 192.168.1.255 except 192.168.1.111 (If you do have a wireless connection also, do not use that IP address either, or any IP address of any of your other connected devices. All Devices connected via Ethernet must use there on distinct address.)
  • For the subnet put in 255.255.255.0
  • For the Default Gateway put in 192.168.1.1
6.  If you also have wireless, you may have to turn off the wireless connection to get the computer to use this static connection.
If http://gemini does not work, but using an IP address does, then NetBios is probably disabled in your computer.  You need to enable it.  See Enabling NetBios on Windows Networks.

This Section is for Configuring XP:
1. You need to get to the window shown in figure 1. This is the Network Connections.  You can get to it by clicking on the Start Selection in the taskbar, then select "My Network Places" and the in the left column, select "View Network connections".
2. In figure 1, you will see all the Network hardware devices you have. If your computer has just a wired connection you should see one similar to Fig 1.
If your computer has both a hardware and wireless connection you will see two devices. We are not interested in the one for the wireless network.
Right mouse click on the one for the hardware connection, it should not have the word wireless in it anywhere, and select Properties. The window shown in Fig 2 should appear.

Fig 2 Click on image to see larger version
3. Highlight the line that says "Internet Protocol (TCP/IPv4)" and click "Properties" Figure 4 should appear. 


Fig 3

Fig3A What the Gemini-2 is set to.
NOTICE: DHCP is UNCHECKED!
Use Menu-->Mount-->Network to get to this page.
4.  Note: it will have Obtain an IP address automatically selected more than likely.
  • We are going to change to "Use the following IP address" so select that.
  • The IP address box will now be un-grayed out.
  • Put in 192.168.0.100 (can be anything from 192.168.0.2 to 192.168.0.255 except 192.168.0.111 (If you do have a wireless connection also, do not use that IP address either, or any IP address of any of your other connected devices. All Devices connected via Ethernet must use there on distinct address.)
  • For the subnet put in 255.255.255.0
  • For the Default Gateway put in 192.168.0.1
  • Do not change any other setting and click "OK"
  • Close all the other windows.
  •  You should now be able to get to the Gemini by using either http://gemini or http://192.168.0.111
5.  If you also have wireless, you may have to turn off the wireless connection to get the computer to use this static connection.
If http://gemini does not work, but using an IP address does, then NetBios is probably disabled in your computer.  You need to enable it.  See Enabling NetBios on Windows Networks.

Below are the steps for setting up your Windows 8 computer with a static IP address.

  1. From the Start Menu (Tiles), open the Charms bar by moving the mouse to the right bottom corner of the screen or press the Windows Key + C and click on Search.
  2. Highlight Settings.
  3. In the Search box type Network to search for any network related options
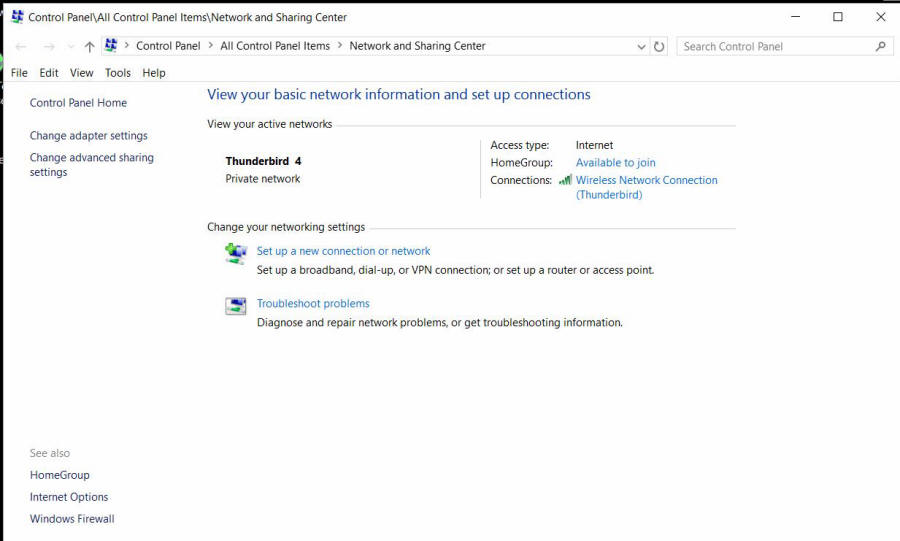
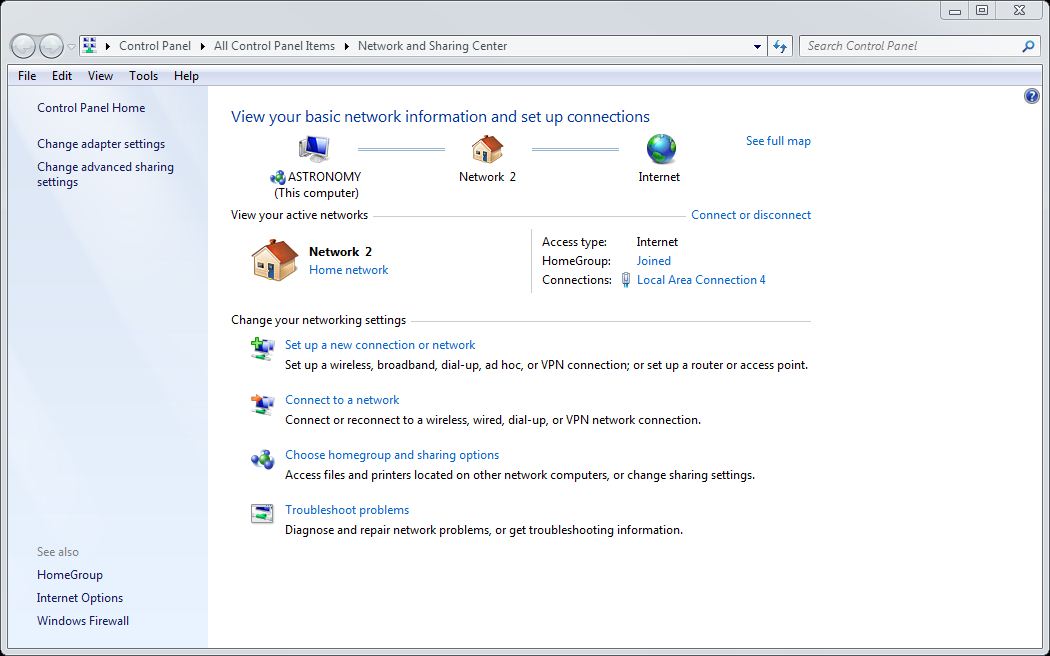
  4. From the list options choose Network and Sharing Center.

(Note: As an alternate option, you can also use Windows key+X from the Start Menu (Tiles) to open the "classic" menu and choose Control Panel, then choose Network and Sharing Center).

  1. From the View Your Active Networks section, select Local Area Connection.
  2. Go to Properties.
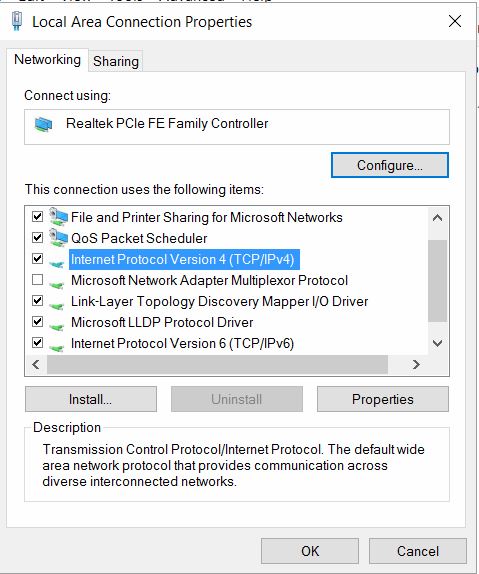
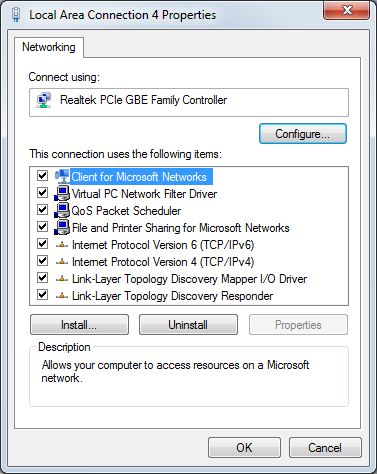
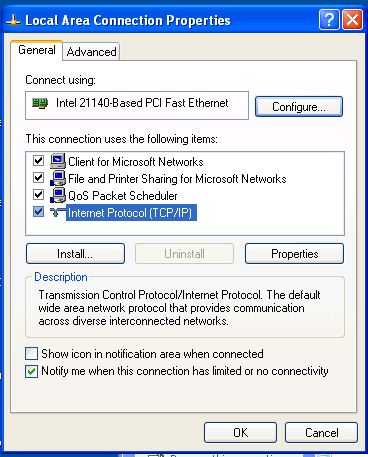
    Result: The Local Area Connection Properties screen appears.
  3. Highlight Internet Protocol Version 4 (TCP/IPv4) and click on Properties.
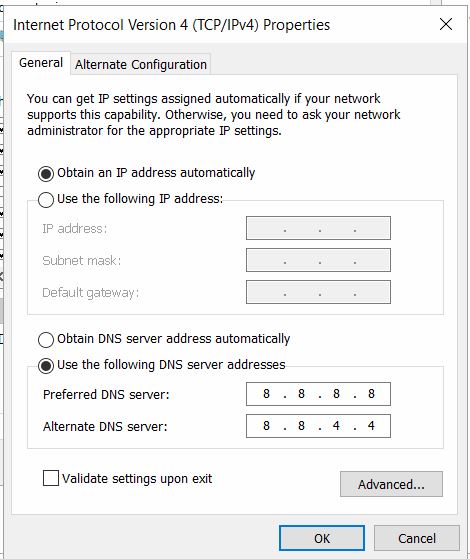
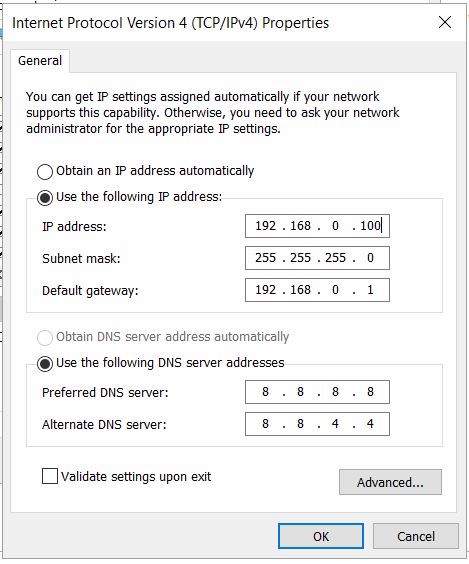
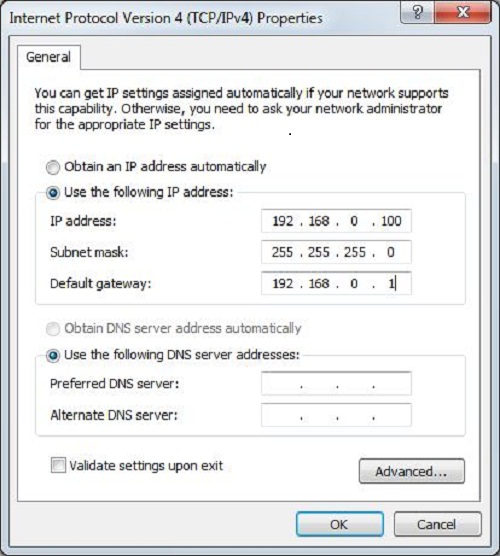
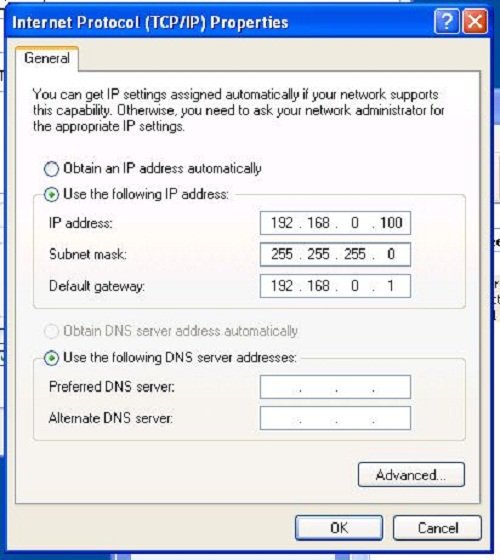
    Result: The Internet Protocol Version 4 (TCP/IPv4) Properties screen appears.
  4. Click Use the following IP address.
  5. Complete the configuration fields as shown below. This part of the configuration requires attention to detail, because one error will prevent you from getting on the network. Be sure you have this information at hand when you start to configure the TCP/IP protocol:
    • IP Address: 18.x.y.z (where x,y, and z are numbers)
    • Subnet mask: 255.255.0.0
    • Default gateway: 18.x.0.1 (Where x matches the x in your IP address)
    • DNS (Domain Name Servers): 18.71.0.151, 18.70.0.160, 18.72.0.3
  6. Enter these numbers in the appropriate fields and click OK.
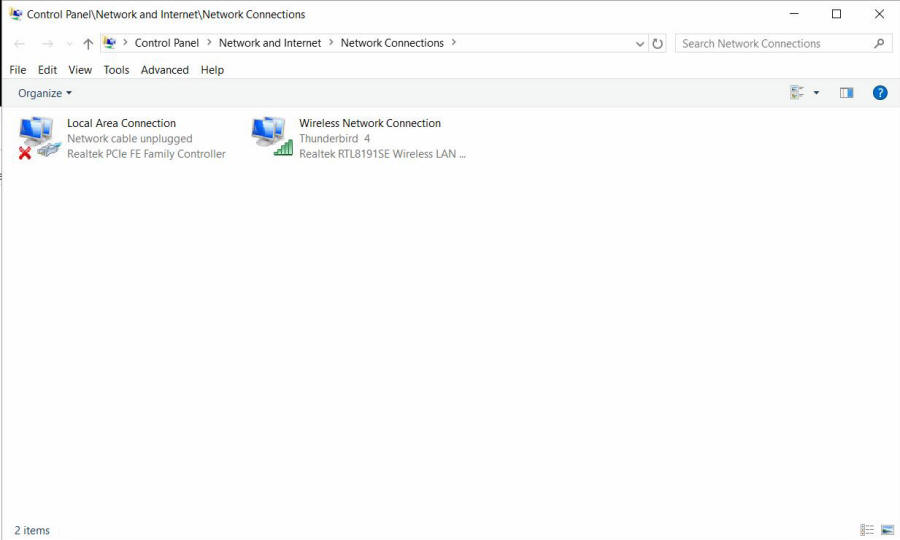
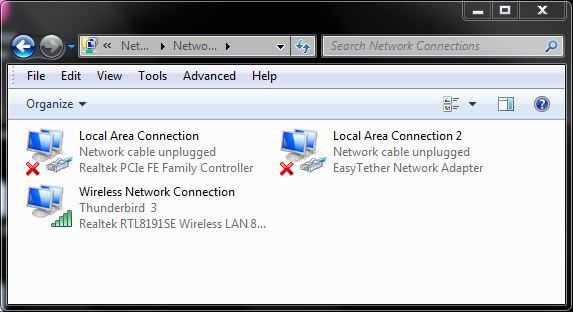
  7. Continue to click OK or Close as appropriate until you return to the Network Connections screen. The Local Area Connection icon text should now say "Enabled".
  8. Test your TCP/IP Settings: Launch your web browser. If you have completed the configuration successfully, the browser opens at your designated home page. If you have not completed the configuration, you will receive an error message that says that your browser was unable to connect properly. Go back and check your settings.