Connecting to Web interface of Gemini 2

This guide will help you connect using the Ethernet connection to your Gemini 2.  NOTE: "PORT E" AT THE TOP IS NOT AN ETHERNET PORT. DO NOT CONNECT AN ETHERNET CABLE INTO IT. Also make sure you do not plug the Ethenet cable into Port F.
Advantages of using Ethernet over other connections interfaces.
  1. Makes the web interface of the Gemini-2 accessible. This can only be accessed through the Ethernet port, using a web browser.  Almost all web browsers including ones in cell phones and tablets are supported.  
    • Use with wireless router to provide wireless control via Smart Phones/Tablets
    • Selection all of the targets in all the catalogs.
    • Upload individual files to the SDcard, such as updates to the main Processor, or updates to the hand controller.  Can also upload catalogs to the hand controller or main unit.
    • See the status of all ports, battery, and power connections.
    • See how the servo motors are preforming.
    • Totally control the Gemini-2 with the Web interface if you want.
    • It provides for slewing to targets,
    • Building a model,
    • Moving the telescope,
    • Setting almost all setting.
    • Watching what the ports, and power levels are doing. 
    • Longer wire lengths than USB or serial without special made cables.
    • Faster than USB or serial.
    • Can be made wireless.
    • Can use File Transfer Protocol (FTP) into the micro-SDcard contents, to save models, PEC and other setting to a computer and restore them.
    • Ethernet cable can be less expensive.
    • Much more reliable.
    • Less cables to the Gemini-2.
    • Access the Gemini-2 from any computer on your network.
    • Able to Update Firmware via an FTP connection, or the NEW Gemini Firmware Updater Program.


  1. Can control the mount using the Gemini.net ASCOM driver.
    • Mount Control
    • Guiding through the same connection - called pulse guiding
  2. Provides some ground loop isolation
  3. Not restricted to short distant, as USB is.
  4. If a wireless adapter such as a  Netgear WNCE2001 or D-Link DAP-1350  AP is used then wireless Wifi connection to the mount.

Connecting to a Network:
Gemini 2 firmware can be updated using a built-in web interface. In order to use the web interface, you will need to make a network connection between Gemini and your computer. Note: the Ethernet Port on the Gemini-2 is a dual speed port (10/100mbits).  This means it is either 10Mbits per second or 100 Mbits per second which is determined by the device you are connecting too.  Because of this, connecting to a computer or device that has the same speed limitations can be problematic. Most devices that only have this speed range cannot detect what wiring an Ethernet cable has.  So if you are trying to connect the Gemini-2 to a computer/laptop, that only has a 10/100 Mbits connection, the connection is more than likely to fail.  To prevent this, It takes either an auto detecting Ethernet port or a 3 speed port such as a 10/100/1000 Mhz port to detect what kind of cable is being used.  Most modern routers are now what is called Gibit Routers (10/100/1000) speed or auto detecting and can detect the cable type. Many of the Newer Win10 laptops are also. The Gemini-2 cannot determine the cable type.  But this only has to be done on one end of the cable by one GBit Device, I.E. a Gibit Computer, Router or Switch.  If your Computer, Router, or Switch is not a Gibit model or auto detecting, you might have to use what is called a cross-over cable, to allow the Gemini-2 and computer to see each other.

Now we will discuss networking methods for devices to get each others ID or IP address.
  1. Using a router. This is called Network with DHCP.  I find this the easiest method.  The router can assign the Gemini-2 an IP address, as long as the base subnet address of the router is in the http://192.168.x.xxx range.  If it is not, then you will have to manually change the Gemini-2 IP address to match the routers base Default Gateway address.   Examples would be change the gemini-2 Default Gateway address to http://192.168.0.1, which it normally defaults to.  Some routers such as Netgear brands use http://192.168.1.1 for there Default Gateway so you would put the Default Gateway to 192.168.1.1.  With these setting then the router can assign an empty DHCP IP address to the Gemini-2. On any local network, no two devices can have the same IP address. All devices on a network must have it's own unique IP address.  Also note that although the Hand controller can show the IP address, the address shown is that of the main Gemini 2 unit. The hand controller does not have it's own Ethernet connection or IP address.  Please note: Some browsers try to connect using a secure connection,  https://  This will not work with the Gemini-2.  It has to start with http://

  2. The Direct method. This method uses a Ethernet cable directly between you computer and the Gemini-2.   If your computer has a 10/100 Mbit Port, then you will have to use a Crossover cable.  If your computer has a 10/100/1000Mhz port then you can use either a crossover or a standard patch cable.  A 10/100/1000Mhz Switch or hub might also be inserted into this method, and then standard patch cables can be used.  Note: A hub does not provide any method of changing IP addresses.  I would like to recommend a USB to Gigabit Ethernet adapter instead of a cross-over cable if your computer does not have a 10/100/1000 bit Ethernet port, and you do not want to use an external hub.  This will give your computer two hardware Ethernet ports, assuming your computer already has one.

  3. Here is a drawing of these methods, the top 2 illustrations are the direct method and the bottom is the Router method. Now if the router or switch is 10/100/1000 (Gigabit) then either type of cable can be used.

  4. To test where a connections is working use a web browser and enter the web interface by using http://gemini/ or http://192.168.0.111 or http://your gemini2's IP address, into the address bar of the web browser.  A login box will should show up as shown here.  Please note: Some browsers try to connect using a secure connection,  https://  This will not work with the Gemini-2.  It has to start with http://
    Here is a video showing the process of accessing the web interface.

Network with DHCP:
Supports (typical configuration for most home networks with a router): If you are connecting Gemini to an existing network through a switch, hub, router or wireless adapter, and there is a DHCP server on the network, use this procedure. Gemini will be assigned an IP address by the DHCP server. It is important that your computer also be set to either use DHCP to get an IP address, or use a static IP address on the same subnet.
  1. Connect the Gemini 2 unit to the existing network through a hub, switch, router or wireless adapter.
  2. Power Gemini on. It is important that you do this only after you’ve connected the network cable so that it can communicate with the DHCP server.
  3. Make sure your computer is set to receive an IP address from DHCP. Each operating system does this in a different way, so refer to your OS documentation.
  4. Gemini uses NetBIOS name resolution so that you don’t need to type the IP address into your browser. Enter http://gemini in your browser to access the web server. The username is “admin” and the default password is blank. If you can connect to the Gemini-2 using an IP address in your computer's Web Browser, but not using http://gemini then you can almost bet that the NetBios resolution is turned off for your computer. See below for how to turn it on.
  5. You may optionally configure your DHCP server to assign a specific address to Gemini so that you can always access it using the same IP address. See the documentation for your DHCP server for details how to do this. Note: your DCHP server is often built into your internet router.

The Direct Method:
This is most easily done using a cross-over Ethernet cable directly between Gemini’s Ethernet connector and your computer’s network connector.   If your computer has a 10/100/1000Mhz port then you can use either a crossover or a standard patch cable. Alternatively, you can use a Gibit Ethernet hub/switch (not  a router) and standard cables between Gemini and the hub/switch and between your computer and the hub.

IP Address: In order to successfully communicate with your computer over the network, the Gemini 2 unit must have an IP address on the same subnet as the computer. There are several ways to do this depending on how you connect Gemini to a network. The following sections describe these methods.

If you use a direct Ethernet cable to directly connect your computer to Gemini, you’ll need to assign both the computer’s Ethernet port and Gemini-2 to IP addresses on the same subnet by hand. This assumes that your computer is not running a DHCP server on the network port. By default, if Gemini doesn’t get an IP address assigned by DHCP, it will use its stored value (192.168.0.111) by default).  I know of no computer that can assign attached devices a DHCP address unless you have set it up for Internet Connection sharing.  So the Static address is usually a must.

  1. Use a direct cable to connect Gemini 2’s Ethernet port to an Ethernet port on your computer. What type of cable depends on your computers port specifications, see above.
  2. Use the appropriate tools on your computer to assign a static IP address to the computer’s Ethernet port. Use either my instructions for Windows 10, 8.1 or XP or these (How-To Geek has a web page telling how to assign a static address in a computer for XP through Win10.) The address should be in the form 192.168.0.xxx where xxx is any number between 2 and 254 except 111. Also make sure no other device is using the same address.  No two Ethernet devices can use the same address on a network.  Set the subnet mask to 255.255.255.0. Set the default gateway to 192.168.0.1
    On Windows, you can do this from the control panel. Look for an option to change network connections. Refer to your OS documentation for specific instructions.  Now if you have a router such as a Netgear, then that routers default gateway is more than likely going to be 192.168.1.1  If your routers gateway looks like this, then you probably want to use setting to match that.  Change your computers hardware port to an address that is the form 192.168.1.xxx where xxx is any number between 2 and 254 except 111. Set the subnet mask to 255.255.255.0. Set the default gateway to 192.168.1.1   Now set the Gemini-2 to 192.168.1.111 using the hand controller.
  3. You will need to know your computers default gateway.  You can obtain it by running a command prompt (click on cmd and select run as administrator). See IPCONFIG Example.  At the cursor type: ipconfig /all
    This will show you the default gateways, mac address, and IP addresses of all of your Ethernet ports, if they have been assigned.
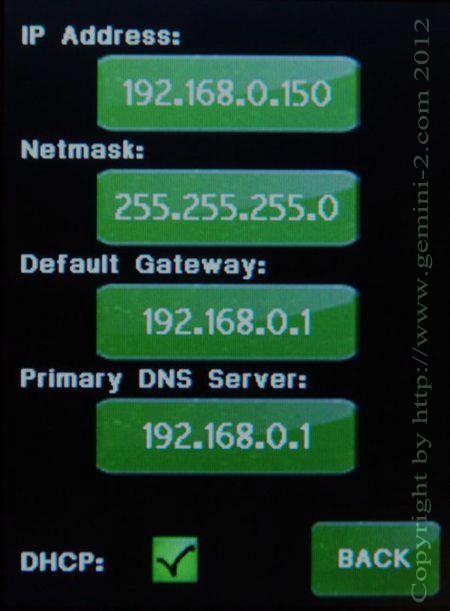
  4. Power on Gemini and attempt to access the web server at http://Gemini or http://192.168.0.111.  or as above if your network is not using the same gateway address.  If this doesn’t work, use the hand controller menu to ensure that Gemini’s IP address is http://192.168.0.111 by selecting the menu->mount->network options. If it is not set to that address, then you can either change your computer’s IP address to match Gemini’s IP address or you can change Gemini’s IP address to match your computers.  Please note: Some browsers try to connect using a secure connection,  https://  This will not work with the Gemini-2.  It has to start with http://
  5. Gemini uses NetBIOS name resolution so that you don’t need to type the IP address into your browser. If you haven’t already done so, enter http://gemini in your browser to access the web server. The username is “admin” and the default password is blank. Here us an example of the login screen (with the user name already added):
  6. If the steps in step 4 above do not work, you may need to enable NetBios over TCIP.  The sets are listed at the bottom of this page.
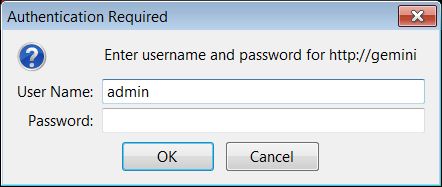

Fig 1


Network without DHCP Support:
You may also have an existing network that does not use a DHCP server to assign IP addresses. Such a network may be using IP auto configuration or static IP addresses in all of your machines.
  1. Connect the Gemini 2 unit to the existing network through a hub, switch, router or wireless adapter.
  2. Power Gemini on.
  3. Power your computer on, if it is not on already. Look to see what IP address is assigned to the Ethernet port on your computer. Each OS has a different way to do this, so refer to your OS documentation. On most versions of Windows, you can type “ipconfig” in a command prompt to see the IP address.
  4. Use the hand controller menu->mount->network buttons to access Gemini’s IP address. Uncheck the DP checkbox. Click on the IP address field and change it to an IP address on the same subnet as you computer. For example, if your computer’s IP address is 169.254.36.12, you should set Gemini’s address to 169.254.36.xxx where xxx is a number between 1 and 254 other than 12. You should also ensure that you do not set Gemini’s IP address to be the same as any other node on the network.
  5. Gemini uses NetBIOS name resolution so that you don’t need to type the IP address into your browser. Enter http://gemini in your browser to access the web server. The username is “admin” and the default password is blank. Note: Firmware versions after Feb 10, 2011 behave as described above. Versions between Feb 6th and Feb 10th don’t support NetBIOS name resolution, so you must type the Gemini’s IP address in your browser rather than using the hostname “Gemini.” Versions previous to Feb 6th do not support DHCP and must be configured as if you are using a cross-over cable or network without DHCP server as described above. Versions between Jan 23rd and Feb 6th use 192.168.0.111 as the IP address, and version prior to Jan 23, 2011 use 192.168.0.100.
From Main Hand Controller Menu use "Menu"==>"Mount"==>"Network"  or "Menu"==>"System"=="network" to see this menu.


Configuring the ASCOM Gemini.net Driver to use an Ethernet connection:
Of course to use the ASCOM Gemini.net driver, you must have ASCOM Platform installed and also the Gemini.net ASCOM driver. See http://www.ascom-standards.org/index.htm to download the latest ASCOM Platform, and then you can get the latest driver from this site. See the Menu selection at the top of the page Under Gemini-2 and download the Gemini.net ASCOM driver.  Once you have the Gemini.net driver installed, goto this page to Configuring the ASCOM Driver Ethernet port.


Enabling NetBios over TCIP for Local Network:
Netbios is what will allow you to use the http://gemini  if using a web page to access the Web interface, or ftp://admin@gemini if using Windows File manager to access the directories/files of the micro SDcard, instead of http://192.168.0.111 (or what ever the Gemini-2 ip address is), or again ftp://admin@192.016.0.111 for accessing the SD card contents.
 
Some Windows systems do not have NetBios enabled.
Note: Normally the default setting on Windows assumes the following: "Use NetBios setting from the DHCP server."   However, if a static IP address is used or the DHCP server does not provide NetBios setting, then enable NetBios over TCIP"
See this page for instructions on how to do this for Windows 7, XP and 95/98/ME.
There is also one other thing to take into account when connecting the Gemini-2 itself, or any WiFi enabled device. If you are using a bridge to connect the Gemini-2 using WiFi then you need to be aware that some routers let you block WiFi connected devices by there MAC address.  
Microsoft Net Framework 4.5 is required for the Gemini.net driver and ASCOM Platform (6.5 is the latest as of this writing) to function.  Note that Microsoft Net 3.5 Framework is installed by default in Windows 7, but it might not be turned on.  You will have to download the Net Framework 4.5 from Microsoft.  See  Microsoft .Net Framework 4.5