You can however change sites 1 through 4.
- Predefined Observation Sites - This lets you
select between 4 Predefined sites. They are numbered between 1
and 4, with 1 being the top one on the hand controller. If you
do a firmware update, they will normally return to the default
sites.
You will also have to use "Select Site" to make sure the one you
want is the active site.
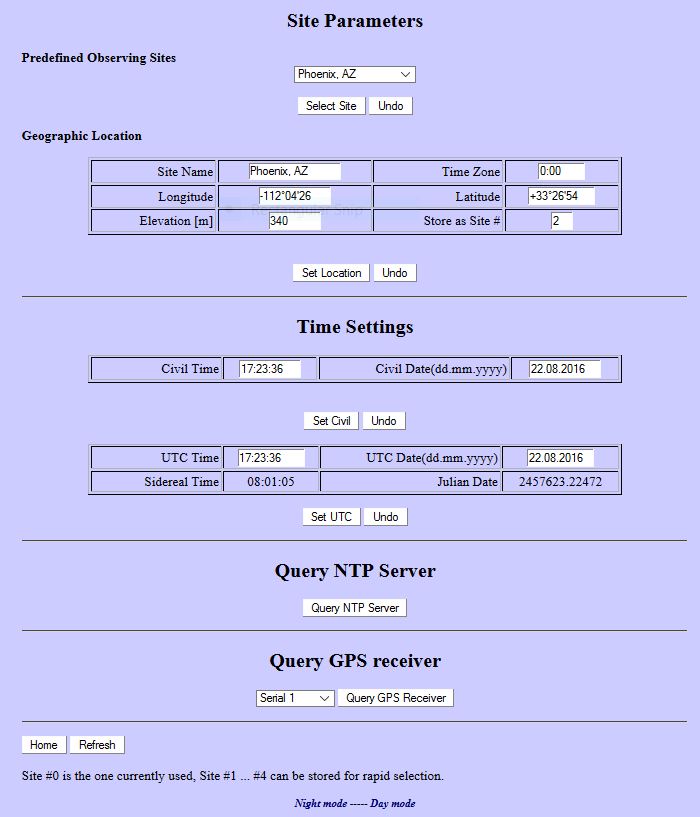
- Geographic Locations - This is where you can define the 4
sites. Notice that Hollywood (Site 1), Phoenix AZ (site2), Berlin Germany (site 3)
and Sydney NSN (Site 4) are predefined by default, but they can be
changed. There is a new
Get
Latitude, Longitude, and time zone page that I generated to help
you.
- To change one of these, Select a new site name and enter it
into the Site Name location.
- Then enter a Time offset from UTC. See above form to get
it from your address. Note that if your
site has daylight saving time, or a partial offset you need to
take that into account.
Time Zone Offset Chart and
Half and Quarter Time zones
This site will
Convert between the Different Coordinates Systems
- Please note the Gemini-2 always uses UTC time and
date for it's internal calculations. The time zone offset is just
a way that your UTC can be calculated from your local time. If you
enter UTC as your local time and set the Time Zone to zero, the Gemini-2
will continue to function just fine. You would never have to worry
about daylight saving time, or half and quarter time zones, if you live
in one of them.
- Then enter both latitude and longitude. Notice
Longitude is negative for the USA. Latitude is positive for the
northern hemisphere. This is the setting that tell the
Gemini-2 what hemisphere it is in, there are no switches to flip
like on some mounts. Use this form
lat_long_from address to get the values exactly as you need to
input them.
- Longitude is entered as 180 to -180 degrees, 0 to 59 minutes, and 0 to 59 seconds.
- Latitude is entered as -90 to +90 degrees 0 to 59 minutes, and 0 to 59 seconds.
- To Convert Decimal Degrees to Degrees Minutes Seconds see
these instructions.
- Elevation is optional.
- Enter the Site number you want to store this information
for: 2, 3, or 4
- Select the set Location button to store the values.
- The undo should put back the original values before hitting
Set Location button.
- If you want to use this site you just entered, then you need
to select it in the "Predefined Observing Site" pulldown, and
then hit "Select Site"
- Time Setting:
- Civil Time: Enter it as Hours (24 hours format) : Minutes :
Seconds
- Civil Date: Enter it as Month (2 digits). Day (2 digits).
Year (4 digits)
- Hit Set Civil - this should update sidereal time and Julian
date. It should also update the UTC time and date if you
have the offset correctly set for the site.
- UTC Time: Enter it as Hours (24 hours format) : Minutes :
Seconds
- UTC Date: Enter it as Month (2 digits). Day (2 digits).
Year (4 digits)
- Hit Set UTC- this should update sidereal time and Julian
date. It should also update the civil time and date if you
have the offset correctly set for the site.
- The Query NTP Server - You can get the time from a
national NTP server or you can make your Windows PC act as a NTP
server. (The Window PC will need a Registry Patch to act
as a NTP Server.) You do this by putting in the IP address
of the NTP server you want to use in the. If you have a
proper NTP IP address and internet connection, then hitting the
"Query NTP server" button will go out and bring back the time in
UTC hours, minutes, seconds and the UTC date. The Time
offset for the site does not matter. If you have it
correct then your local time and date should show up. If
you have the time offset set to ZERO then the local time setting
will be the same as the UTC time and date setting. This is
because the Gemini-2 only uses UTC time for all it's
calculations, and a NTP server returns UTC time/date only. To
enter the NTP IP address see Net
Time Protocol in the Network web page. Also see
NPT instructions.
- The Query GPS Receiver - You can select the serial com
port that the GPS receiver tries to use to get GPS setting.
Com Port 1 is default. See setting
Serial Ports for
setting the GPS baud rate. Hit Query GPS receiver to get a new
GPS reading.
Note: If you are using a GPS receiver. to get the time, then the time zone offset does not matter. The Gemini-2 only uses UTC time for all it's calculations, and a GPS returns UTC time/date only. You can disregard local time when using a GPS receiver. However, if your time zone offset is not correct, then the Gemini-2 will show a wrong Local time and date. This really does not throw off any calculations of the sky position calculations.