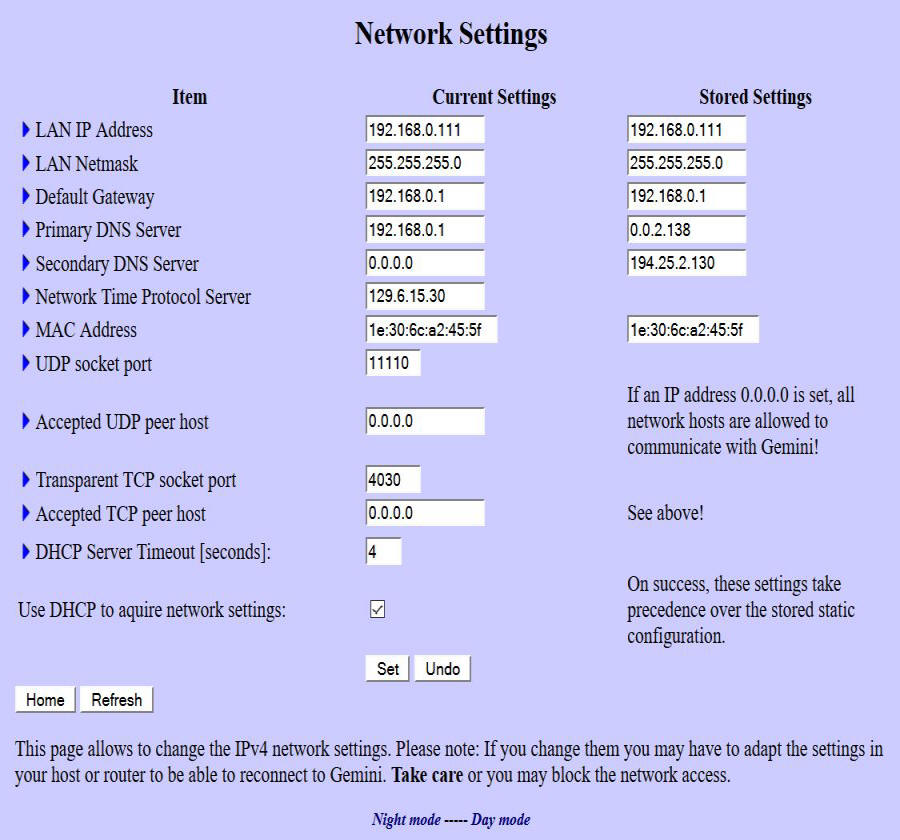
- LAN IP Setting: There is both a current and stored setting. The stored setting will be what the gemini-2 defaults back to if no DHCP server can be found at startup. The default IP address for the Gemini-2 is 192.168.0.111
- LAN Netmask: should almost always be 255.255.255.0
- Default Gateway: This address should be the same as your routers base address if using a router on your network. If you change the Default gateway to match your routers address to something like, 192.168.1.1 then you must also change the IP address of the Gemini-2 to match that base address. It could be anything in the range of 192.168.1.2 to 192.168.1.254. Otherwise the Gemini-2 cannot find your network. Also make sure you do not use the IP address of anything that is already on your network, such as your computer. Also the stored setting is what the Gemini will fall back too, if no DHCP address is found.
- Primary DNS server: address should be the same as your routers base address if using a router on your network. If you assign the Primary DNS server address to your routers base address, hopefully your router will allow the use of NetBIOS name resolution. If it does, then http://gemini for web pages access and ftp://admin@gemini for micro SDcard directory/file access using Windows file manager should work. DNS servers change an Name into an IP Address.
- Net Time Protocol Server: This IP address is where the Gemini-2 can get NTP time from. It can be from a local computer on your network, or from a National Time standard. If from a Local Windows computer, that computer will probably need a registry Patch to be able to act as a NPT time server. Please see both NPT instructions and the Site/time page.
- Do not mess with the MAC address, unless you have two Gemini-2 units on the same network. If you do have two Gemini-2 units, please see Changing MAC Address It is really easy to change the MAC Address on one of the Gemini-2 units. Just change the :5f to a :5E for example under both the "Current Setting" and "Stored Setting". Then change the default and stored IP address to 192.168.0.110 or one that fits you network under both the "Current Setting" and "Stored Setting" . These changes will allow a Router to assign different IP addresses to each Gemini-2. THis way each will be seen as separate devices on the network. Just note you will have to use each separate IP address to access them. You will not be able to use http://Gemini/ to do so.
- Do not mess with the UDP port address. The ASCOM driver expects this port to be used for UPD communications.
- Do not mess with the TCP socket port unless you understand what this does.
- To help protect against spam and abuse, you can now specify the host IP address so that the Gemini-2 will only respond to the host assigned to it. For a transparent UDP or TCP communication one can do two things for protection now: Setting the port to zero disables the feature. One who needs it and especially in an observatory can specify the IP address of the host that is allowed to use this. The default will stay at INADDR_ANY (0.0.0.0), but as you can see a warning at the network page. Users who use this address, allowing each host on the Internet to access their Gemini, are responsible to use a separate network or protect it. This only effects applications that use sockets like skysafari that connects through unprotected sockets. The Web interface and FTP access will still be available, because they are password protected.
- The DHCP server Timeout in seconds, is the amount of time that the Gemini-2 can look for an DHCP assigned IP address, before it defaults back tho the Store Setting address, normally 192.168.0.111.
- Use DHCP to acquire network setting: check box, if checked will tell the Gemini-2 to try and gets it's network setting from a DHCP server, normally the router on your network. Note that most computers cannot assign a DHCP ip address to devices connected to it via Ethernet.
- If doing a direct connection to a laptop computer without a router, you will have to turn off DHCP in the Gemini-2, or wait for the timeout. See Connecting to an Ethernet Port for more information.