Using FileZilla to install OCT 25, 2013 (main unit) and Feb 20, 2014 (in HC) Firmware

If you would prefer to use Windows File Manager instead of FileZilla to do the install go here.

Now updating this firmware yourself will be at your own risk, and Hollywood General Machining, Inc. (Losmandy) or any one associated with them, or anyone associated with http://www.gemini-2.com will and can not be held liable if anything goes wrong. YOU DO THIS AT YOUR OWN RISK. I suggest that you contact Losmandy at (323) 462-2855 or Scott@Losmandy.com or Russell@Losmandy.com and get there permission to do this update.  That way you are covered if anything goes wrong.
I have provided the best instructions that I can, but there is absolutely no guarantee, that everything will work as expected.  If you do intend to do this upgrade, please read all the instructions first, and make sure you completely understand them. 

I can sometimes provide help using Teamviewer (if you are in the USA or Canada), but even If I do that, you understand and acknowledge that doing so is completely AT YOUR OWN RISK. The only way for this to be not at your own risk is get permission from Losmandy to do the update. So please get the permission first, preferably via Email, so you have it in writing.  I would also like to see that email before I attempt helping you.  Or an email from your dissolving me of any liability if anything goes wrong. I do this using my time, and do not charge for it, so I don't think that is too much to ask.
If your network Default Gateway is http://192.168.1.1 then it would be best if you configured your laptop and the Gemini-2 to a default gateway of http://192.168.0.1 before doing this update. Here are instructions on configuring Windows and XP .  The reason for this is it is about a 99% chance that the Gemini-2 is going to default back to http://192.168.0.111 after this update.  If your network does not match then you will not be able to reconnect to it.   
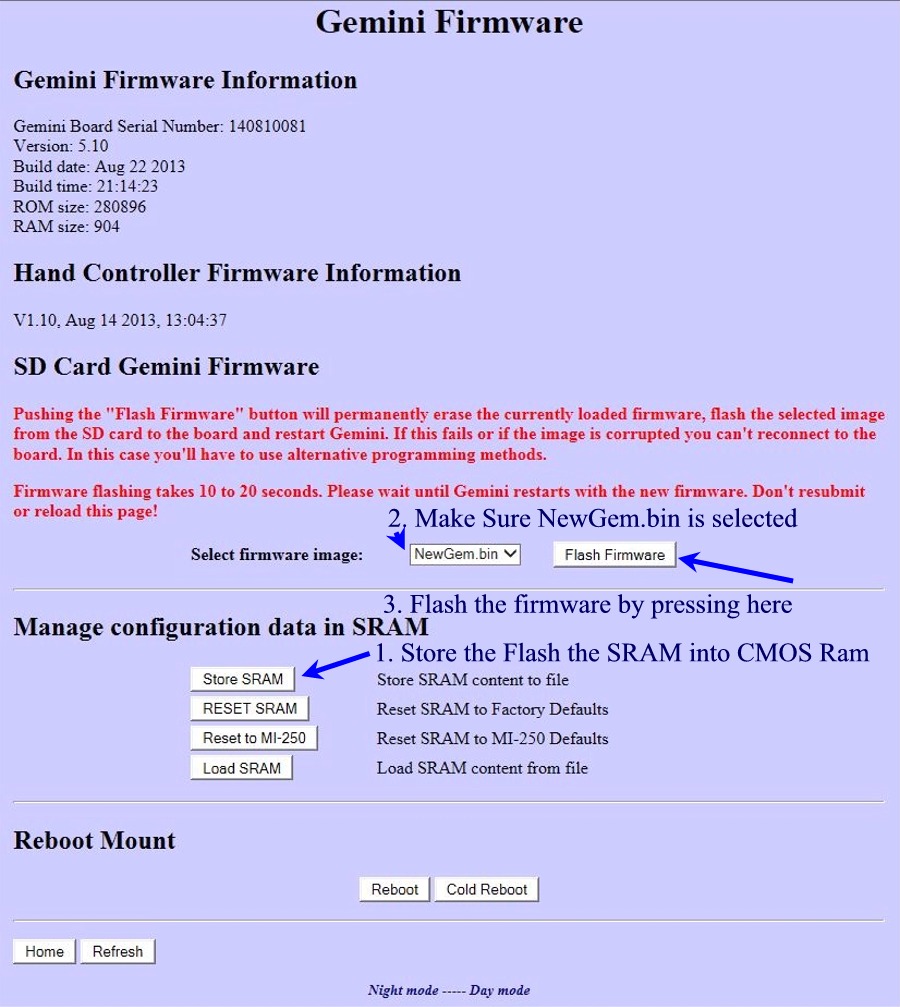
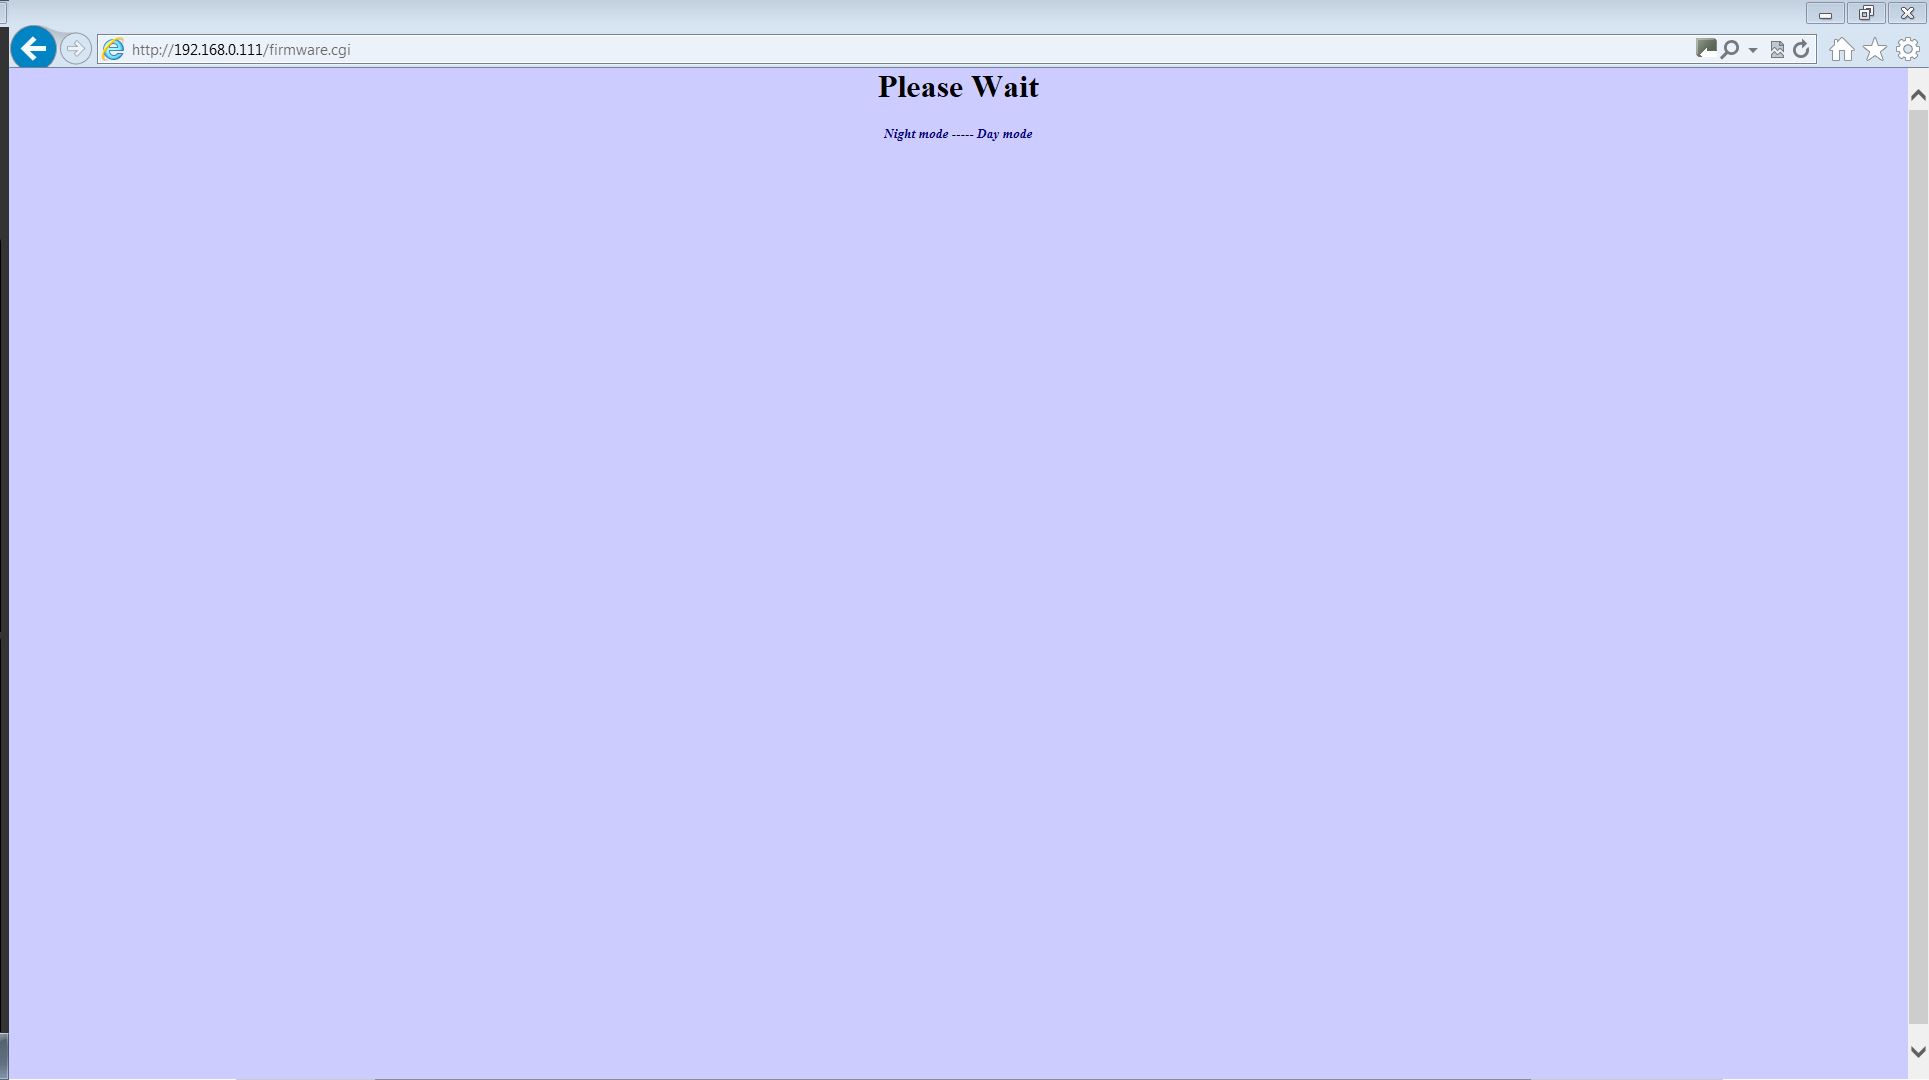
NEW-RELEASE: Please note that a new release of the hand controller and main firmware has has been released. If you already installed the Aug 27, 2013 firmware with the  Aug 27 Hand controller firmware, there is no reason to reinstall most of the firmware. You just need to install the Oct 25 NewGem.bin and Sept 30 gemhc.bin files to be up-to-date.   This fixes the PAA, Identify and Bookmark functions.  Also, the tactical buttons have been activated for the balance screen and also the set limits screen in the hand controller.  To install it, download the file.  Then unzip it to a clean directory,  It contains both files listed above.   Upload the gemhc.bin file into the Gemini-2 into the HCFirmware directory.  You can do the with FileZilla, Windows File Manager (use ftp://admin@gemini) or the web interface  using the SDcard Tab http://gemini/sd.cgi upload feature. If using the web interface, after clicking on the SDcard tab, single click on HCFirmware directory the use the browse and send buttons to upload the file.  After it is uploaded, unplug the hand controller and plug it back in.  This will cause it to upload into the hand controller, and be flashed into the processor. After the hand controller is updated, use the same process but put the NewGem.bin file at the root of the SCcard, not in any directory. Then go to the Firmware/SRAM tab and select the Newgem.bin file and then Flash it.    After this is done, turn off the Gemini-2 and back on to synchronize the hand controller and main unit.  These updates is already included in the combine file after Oct 25, 2013, so if you do the full upgrade, you will get the latest firmware.  If you did the firmware updates on the page prior to Oct 25, 2013, then you only need to follow the instructions in the paragraph. Here is a small movie of the process.

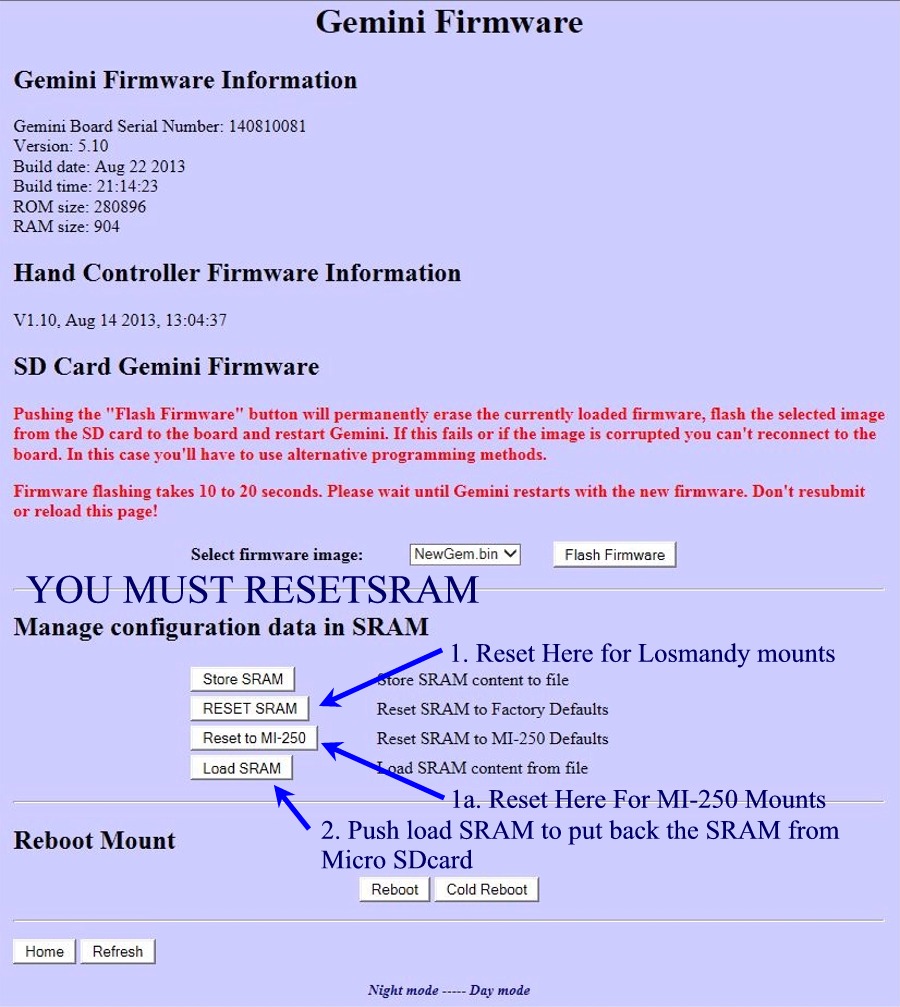
In a nutshell here is what we are going to do.
1. Unplug the hand controller
2. Create an empty directory
3. Download the combined.zip file into the empty directory.
4. Unzip the combined .zip file in the empty directory.
5. Upload the extracted files to the micro SDcard in the Gemini-2
6. Use the web interface to tell the Gemini-2 to program itself with the new NEWGWM.bin file
7. Reset the SRAM
8. Plug the hand controller back in and let it update, it's firmware and button files.
9. Then install the catalog files into the HCFirmware directory of the main unit
and let the hand controller upload them as a separate function. 

This update takes a long time to install.   If you wish, you may put the Gemini-2 into the terrestrial tracking mode and unplug the motors. The Gemini-2 will not be damaged by being turned on without the motors connected. The terrestrial mode is to keep the Gemini-2 from beeping continually, with the motors disconnected.   Also take a note of the catalogs that are already in your Hand Controller. If you already have them, you may not need to upload them again.  See Step 20 below for more on this.

This set of instructions assumes that you have already downloaded and installed FileZilla FTP.  If you have not, then see Installing-FileZilla and then come back here. Please use the Client version of FileZilla.  You are also going to need some kind of file unzipping program.  I recommend 7Zip as it is free for Windows or Kela for Mac (which uses the 7zip engine) and is free.  Just download and follow the prompts the installation prompts. It also assumes that you know how to connect the Gemini-2 to your computer or network.  If you don't see connecting to Ethernet port.

Please do not forget to install the latest ASCOM driver for use with this Firmware upgrade.  See Gemini-2 -->USB and ASCOM drivers on menu bar above.

I created a movie that demonstrates the installation process.  A Flash version  or a Windows.exe version is available 


1. Please un-plug the hand controller.

2. Before you start, you need to make an empty directory to download the updated firmware into. I suggest creating one at C:\Gemini-2

3. You will need to download the program.  Now 1 of the three below windows should pop up depending which Web browser you are using. Click this link to start downloading https://gemini-2.com/firmware1/combined.zip
  • If using Windows IE: click here to see window. Please use the Save as option and browse to C:\Gemini-2 for the save location.
  • If using Firefox: Click here to see window.
  • If using Chrome: Click here to see window. You will need to browse to the C:\Gemini-2 folder.
4. After doing one of the above save options, you should have a window that looks like Fig 1 below. For you MAC users, you will have to use what ever MAC provides in place of File Explorer that windows uses,  I think it is called the "Finder. "


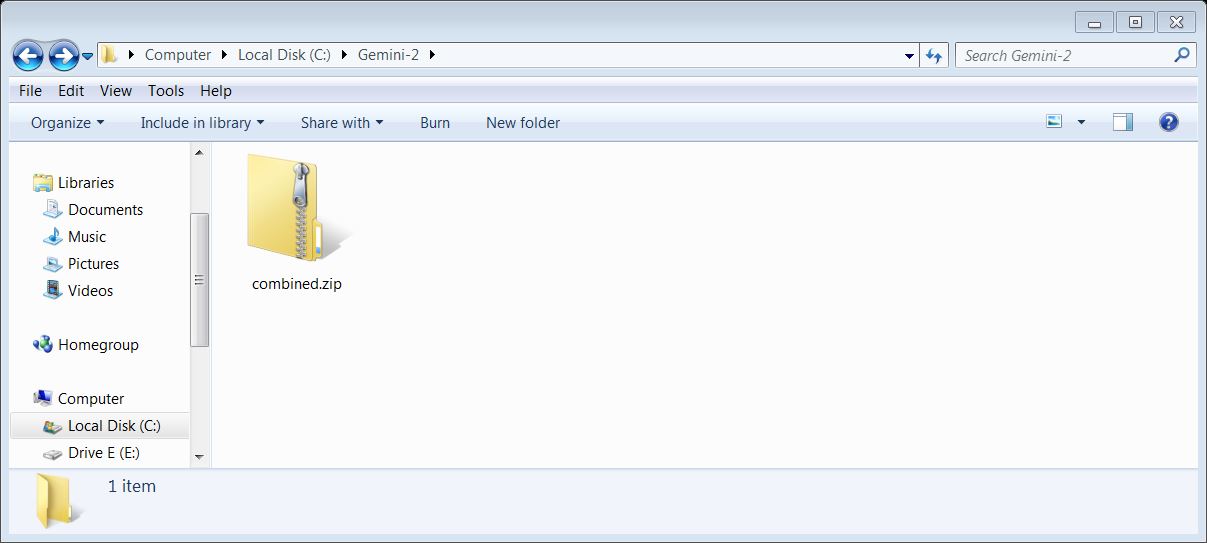
Fig 1 - click on image to see larger image

5. In the next figure (Fig 2), you will be using 7-Zip to extract all the files into the same directory as the combined.zip file.
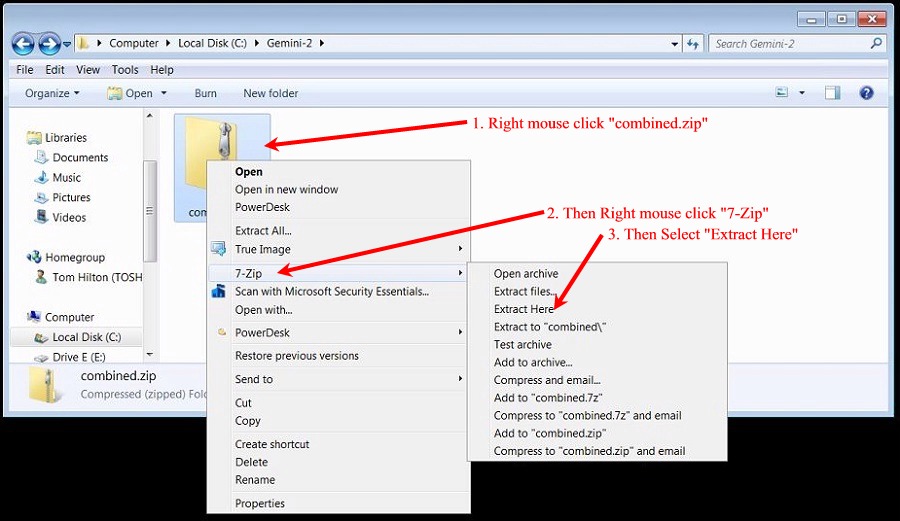
  • Right mouse click on the combined.zip file.
  • Right mouse click on the the 7-Zip selection
  • select the "Extract here " option.  See figure 2 below.


Fig 2

4. The directory should look like below, if you used the "Extract here option "
 (I have  Large Icons selected under more options
on the right top menu bar.)


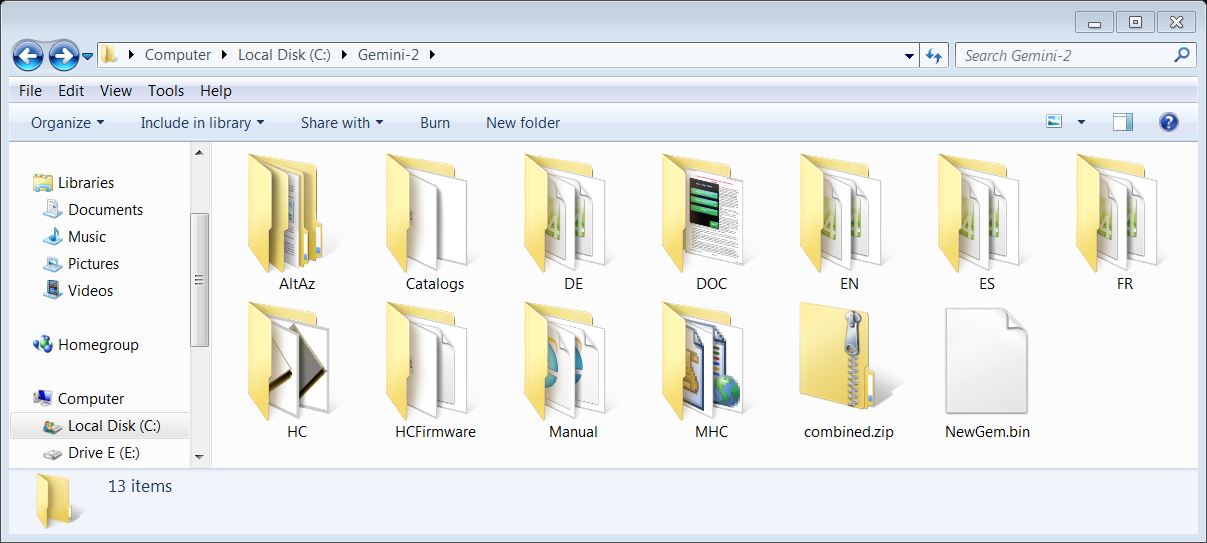
Fig 3 - Click on image to open full page image

5. Now right click on the combined.zip folder/file, and either use Cut and paste it in another directory on the hard drive or delete it.  Your choice as we will not need it anymore.  You can always download it again.

6. Now you need to open up Filezilla.

7. Click on the File and select Site manager. A window similar to Fig 4 should open.
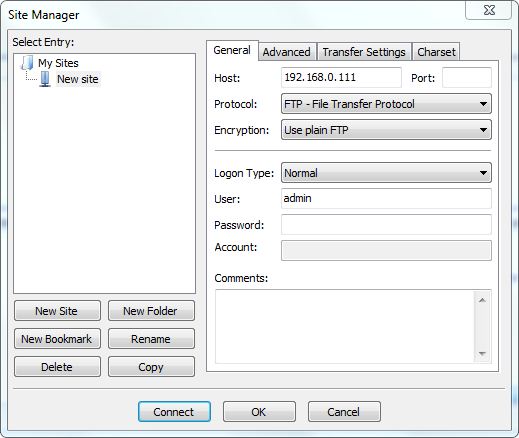

Fig 4

8. Fill out the form with these values:
  • In the box Host: put 192.168.0.111 or whatever your Gemini-2 IP address is.
  • Protocol: - Select File Transfer Protocol
  • Encryption - select use plain FTP
  •  Login Type - Select Normal
  • User: Put in "admin " without the quotes.
  • Password - leave blank
  • Select Connect or OK

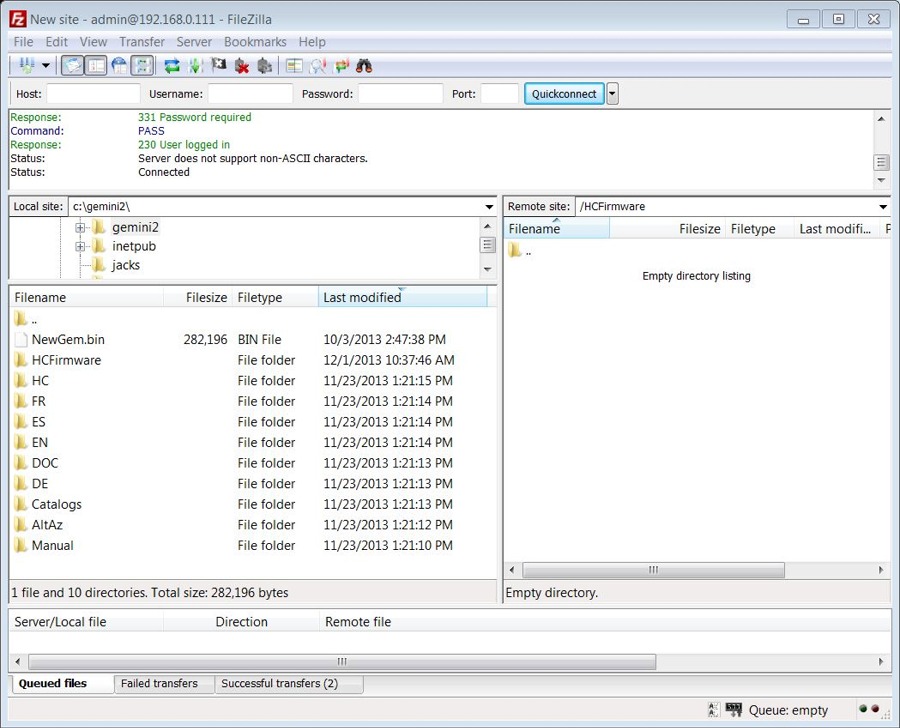
9. A window similar  to figure 5 should open.  You will need to change the Local Site to C:\Gemini-2.
Also under View, make sure that "Transfer Queue is selected.
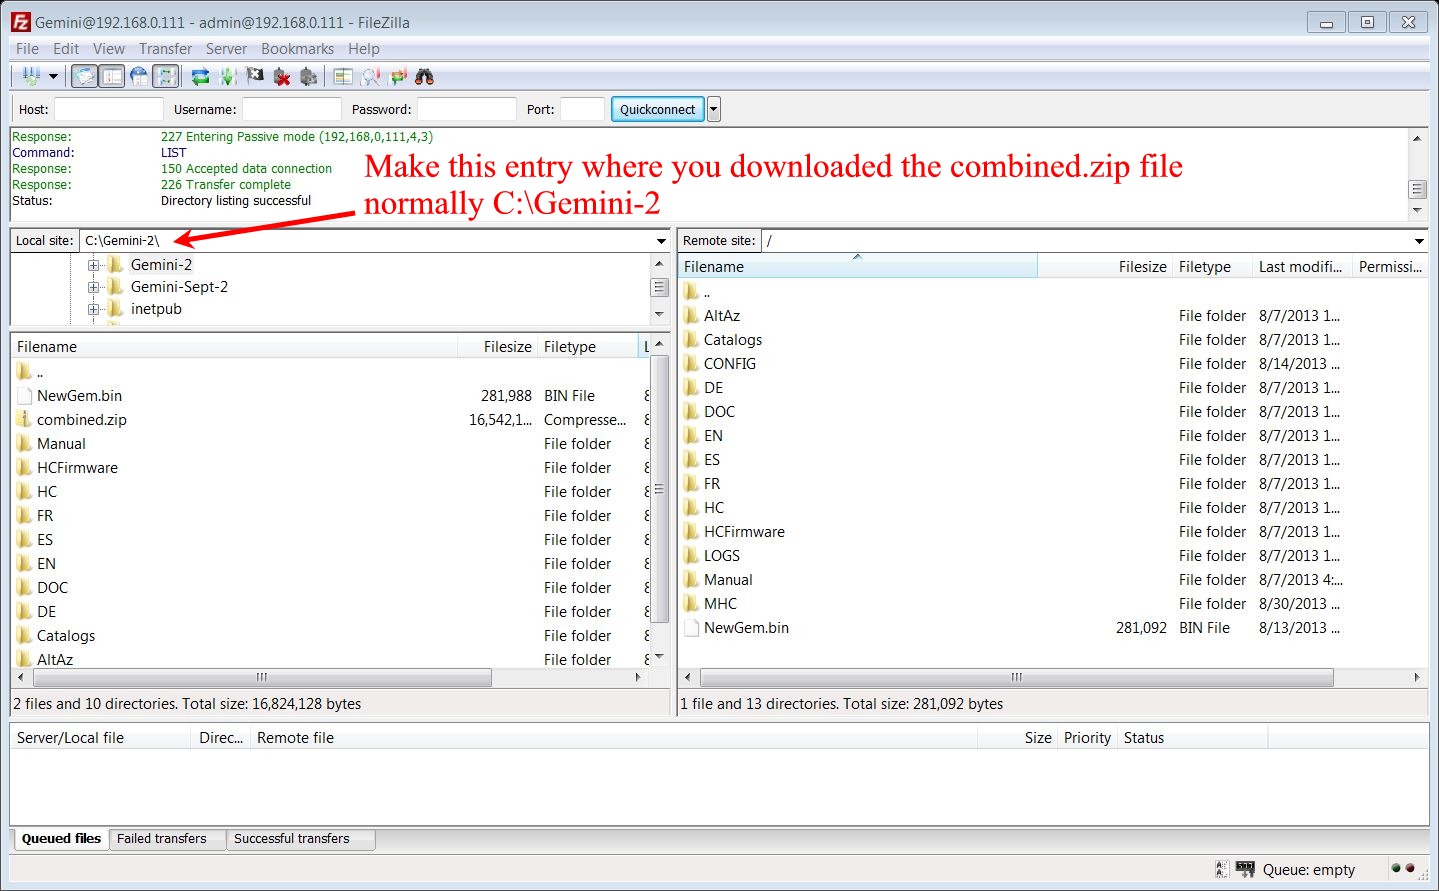

Fig. 5

10. Now in the Right panel and check to see if a NewGem.bin or a HGM_Gem.bin or a Cur_Gem.bin file exist.  It it does, Right mouse click on it and select delete.  This will keep you from loading older firmware. See Fig 6 below.
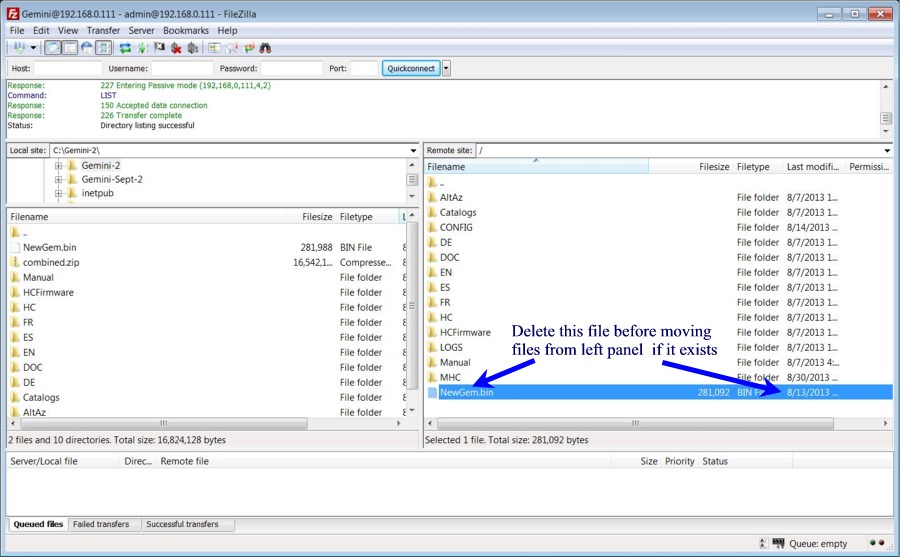

Fig 6

11. Now in the Left window (Local Site) highlight all the directories and files as shown below To do this:
Click on the top file or directory, Then press the shift key down, and while holding it down, click the last file in the left pane. See Fig 7
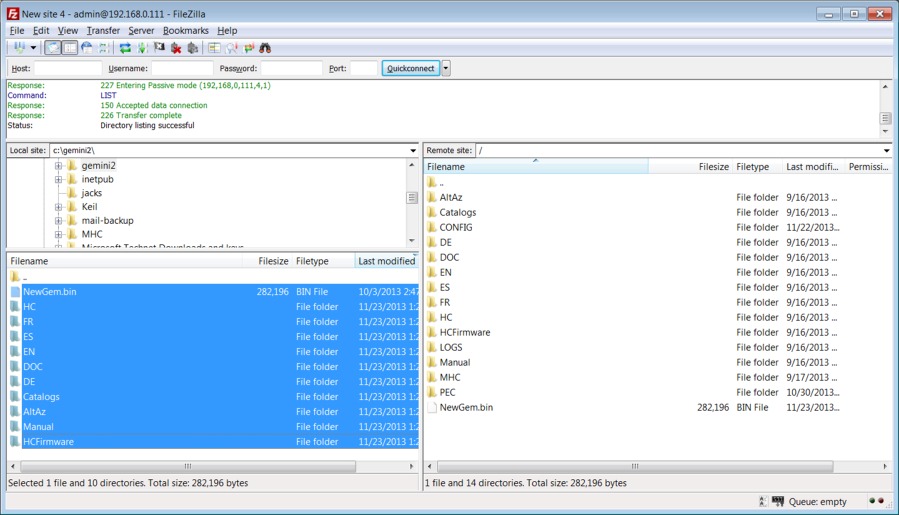

Fig. 7

12. After they are highlighted, right mouse click and select upload. The next window (Fig 8) will pop up. Make sure Overwrite is selected, the select the check box "Always use his action" and then click OK.  Important!, Please check the date of the NewGem.bin file on the right side and make sure it is the same date as the NewGem.bin file on the left side.
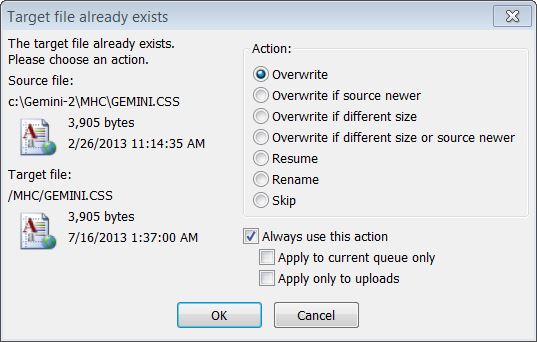

Fig 8

Fig 9
Please take note of the transfer Failed block at the bottom of the screen. If you had any failures, you need to go into the right side and delete these files and then try the update again. You can update each file individually, or do the whole thing.

13. Filezilla just uploaded all the new files overwriting the previous versions of the files. We are now going to tell the Gemini-2 to program the new firmware into the main unit.  This will be done with a Web browser.  You can now shrink down Filezilla for now.  We will use it again in step 26.

14. Open up your favorite Web browser.  In the address bar put in http://192.168.0.111 or the IP address of your Gemini-2.  You can find this on the hand controller under Menu-->Mount-->Network.


Fig 10
15.  Enter admin in the user block
16.  Leave password box empty
17.  Hit OK

Please note that Google Chrome has a pop-up blocker that can stop the popups from the Gemini-2 from showing up.


Fig 11

18. Select the Firmware/SRAM Tab. 


Fig. 12

19.  a. Press the Store SRAM - to store the SRAM contents into the Micro-SDcard for later retrieval.
       b.  Make sure that the box to the right of the "Select Firmware Image" and has NewGem.bin in it.
      c.  Then Push on the Flash Firmware tab in the on your Gemini-2 as illustrated above in Fig 11. This will flash the current program into the ARM processor inside the Gemini-2. The screen will change to Fig 12 below.  Please note that Google Chrome has a pop-up blocker that can stop the popups from the Gemini-2 from showing up.  Popups are required for the Flash Firmware function to function.


Fig 13.

20. The screen should stay like this for about 30 seconds or so. and then come back to Fig 12. If it does not, that means that you are probably using an IPaddress other than HTTP://192.168.0.111.  If it does not come back try putting in Http://Gemini and see if it comes back. If it does not then you will have to goto troubleshooting connection problems. If you have to do that please look at Menu-->Mount-->network, and write down the setting. Then un-plug the hand controller, and proceed to troubling Connections.


Fig 14  Note: The build date for Gemini Firmware should be Aug 27,2013

As shown in fig 13 above, be sure to hit the Reset SRAM button for the type of mount you have.  Then use the Load  SRAM button after you have reset the mount to the proper  mount type. 
This should set your mount type, site, and or limits back to what you had them at before the upgrade. But always check them to make sure.   

21. The Hand controller takes a long time to upload all the catalogs.  If you examine the HCFirmware directory of the micro SDcard, you will see the following files: (See fig 6 above and click into the right side on HCFirmware to expand it.)
Gemhc.bin  - This is the actual firmware-It must be there.
GemLogo.b16 - This is the splash screen you see when the HC powers up.
These are the Red Graphic buttons
R_220x40.c16
RP220x40.c16
R_140x40.c16
RP140x40.c16
R_78x78.c16
RP78x78.c16
R_70x40.c16
RP70x40.c16
R_24x24.c16
RP24x24.c16
R_21x21.c16
RP21x21.c16
These are the Blue Graphic buttons
B_220x40.c16
BP220x40.c16
B_140x40.c16
BP140x40.c16
B_78x78.c16
BP78x78.c16
B_70x40.c16
BP70x40.c16
B_24x24.c16
BP24x24.c16
B_21x21.c16
BP21x21.c16
These are the green Graphic buttons
G_220x40.c16
GP220x40.c16
G_140x40.c16
GP140x40.c16
G_78x78.c16
GP78x78.c16
G_70x40.c16
GP70x40.c16
G_24x24.c16
GP24x24.c16
G_21x21.c16
GP21x21.c16

None of the above files are optional, and must be uploaded to the hand controller.
  However the the star catalogs are optional. After the Hand controller is up and running, you will then install the catalog files.  This is easy to do. 

Arp_EN.guc
LBN_EN.guc
PN.guc
BSL.guc
G2V_EN.guc
LDN_EN.guc
Caldwell_EN.guc
Sh2.guc
Sharpless_EN.guc
Herschel400_EN.guc
Combined_Constellation_Stars.guc
Cederblad_EN.guc
IC,guc (large catalog)
NGC.guc (large catalog)
NGC_constellation.guc (medium size catalog)
SAO.guc (large catalog)
Struve_EN.guc (large catalog)
WDS.guc (medium size  catalog)
Messier.guc
 
22. Now plug the hand controller back into the SERIAL PORT 2, GRAPHICS HC jack

23.  You should see a screen like the one on the below. It shows that the hand controller firmware is being uploaded to the hand controller micro SDcard.

If this does not happen try powering Gemini off and on again.

24.  When this screen on the left is done, it usually takes about 5 minutes are so, then the flashing screen will appear.

Fig 15A and 15B

25. After the Gemini hand controller has flashed its new firmware the HCFirmware directory in the main unit should be empty and the hand controller should have the new firmware loaded.  Note that the button files will automatically also load.  These are files ending in .c16


26. Now if you open the HCFirmware directory of the right side of FileZilla, it should look like the figure below.
Notice that the HCFirmware directory is empty.  This is because all the files was uploaded to the Hand controller. After a file is uploaded to the HC it is deleted from this directory


Fig 16
27. Now doubleclick in the Left menu on the catalogs menu. It should look like below.

Fig 17
28. We are now going to select the catalogs that you want in your hand controller. You do this by doubling clicking on each catalog you want, or you can select the catalogs and then right click and select upload. The choice is yours. Now notice, you may not see them in the right side unless your select F5 which refreshes the view. Now if you want all the catalogs, I would do them several at a time, not all at once, as the hand controller has know to lock up with such massive uploads. Just repeat steps 28 and 29 for each set of catalogs you want. You can tell when they have uploaded, because they will disappear from the right side menu. Again you might have to hit F5 to refresh the screen to dee this.
29. Now once you have the catalogs you want in the right menu, you can either turn off the Gemini-2 and turn it back on, or just unplug the hand controller and plug it back in. Either method should cause the hand controller to upload the catalogs.
After you have uploaded everything to the hand controller, make sure you calibrate the screen.  This is very important after a firmware update.
Please make sure that the updates take by going to the menus on the hand controller or the Web interface that tells you the firmware installed.
On the hand controller go to MENU-->HC-->INFO
On the Web interface go to Firmware/SRAM. You will have to do a cold start, warm start, or warm restart for this page to show the Hand controller firmware version.