Troubleshooting Gemini-2 Problems
Note: most links are from this site and not on the Gemini-2 itself.
 
Please note if you are using older versions of the firmware, please update to the latest and try your problem again before reporting your problems.  To tell your firmware dates go here.
 
When either the Gemini-2 or Gemini-1 starts to show problems/errors, always change the battery.  Low batteries can give very weird symptoms.
 
Report Problems ASCOM Driver won't connect ASCOM Driver won't Install
Back after power fail DEC or RA misbehaving Ethernet problems.
Forced Cold Start HC not connecting How to Bench Test
Low/Bad Battery Symptoms Motor Stall Faults. Mount rejecting stars
Removing Virus or Malicious Software Screen changing languages when touched. Slews Wrong Direction
Some Screens of the HC not functioning after firmware upgrade Tracks in Wrong Direction
 
1. Reporting Problems:
    If you are having problems that you would like to report to the writer of the code for either the Gemini-2 or the ASCOM driver, please follow the steps at /error-reporting.html
   
2. Mount Slews the Wrong way:
    If your mount slews in the wrong direction with the arrow buttons or during an alignment, please check these items.
  1. Make sure the RA and Dec cable are connected correctly. Remember the DEC is the top connector on the mount, and the RA is the bottom connector.
  2. Make sure your Latitude, Longitude, and Timezone are set correctly.  Timezone is the most common error, with the format of the Latitude and Longitude being second.  The seconds must be between 0 and 59 like a clock.
    See site menu.  On HC, Menu-->Site
  3. Make sure you Local and UTC times are showing correctly on the Web interface.
    See Site/Time on the Web interface.
  4. Make sure that your mount type is selected correctly,
    See mount type menu. On HC, Menu-->Mount-->Type
  5. Check that the gearing is correct.
    See gearing and gearing chart.  Oh HC, see Menu-->mount-->gearing.
  6. If you have just done a firmware upgrade, Please make sure you have done a SRAM Reset at the bottom of the Web interface page Firmware/SRAM. 
  7. Make sure your battery is good.  See Low Battery Symptoms
  8. If all the above is correct, and the mount still slews in the wrong direction, and also tracks in the wrong direction, you might have a mount where the gearboxes was replaced with Mclennan gearboxes.  These gearboxes reverse the direction of the drive train.  You will have to use custom mount and change the sign of The RA Worm Ratio and the Dec Worm Ratio, or if you mount is a G11 and both gearboxes was upgraded, you can select MI-250.  You will have to reset your limits also. In menu bar see "Tips/Programs"-->"Gearboxes and Mods"-->"Mclennan Gearbox Upgrade"
    
3. Hand Controller will not connect:
   If the hand controller will not connect, and is only giving the message "Connecting to Gemini"
  1. make sure the hand controller is plugged into the bottom Serial Port 2/Graphics HC connector.
  2. If you just updated the firmware, then the micro SDcard in the HC might have become corrupted. If this has happened, you will have to remove the micro SDcard from the hand controller and then use an external micro SDcard reader/writer (normally USB device) to examine the cards contents.  Note: the only way to see the contents of the micro SDcard in the hand controller is with an external reader/writer. The root of the card should look like this:

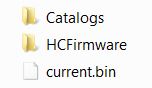
    1. The current.bin file indicates that the program was programmed into the ARM processor.
      If it had not been programmed, then it's name would still be gemhc.bin
    2. While the catalogs directory should have about 20 star catalogs with there names ending in .guc  All the catalog files are optional.  You can have just the ones you want.
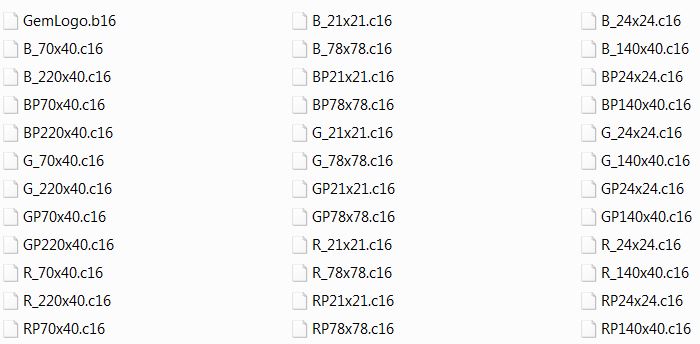
    3. The HCfirmware directory should look like this with 37 files in it.  None of these files are optional.  All must be in the HCFirmware directory for the HC to work correctly.
    4. To remove and replace the micro SDcard please see: Removing Micro SDcard
    5. Also the micro-SDcard in the hand controller comes loose in it socket.  This is especially true of the first versions of the hand controller.  Normally simply reseating the card will fix the problem.
    6. Another problem is that the RJ-12 connectors on the coiled cord, becomes worn.  They are pretty simple to cut off and replace, if you have a crimper for RJ12 connectors.  Most Home Depots, Lowes and Radio Shacks carriers the connectors and crimpers.
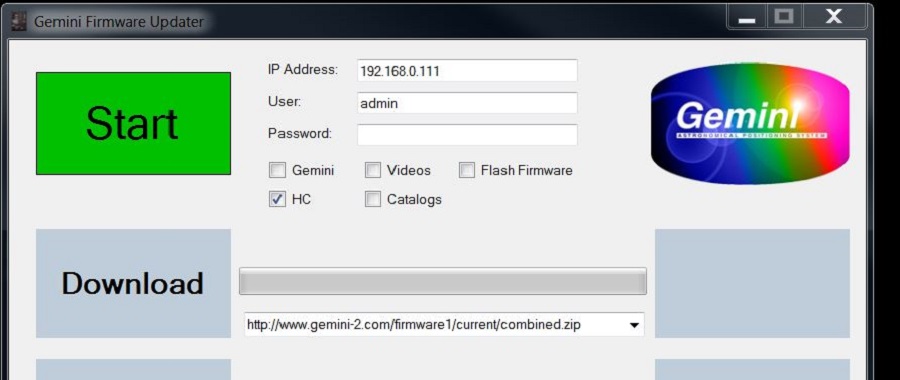
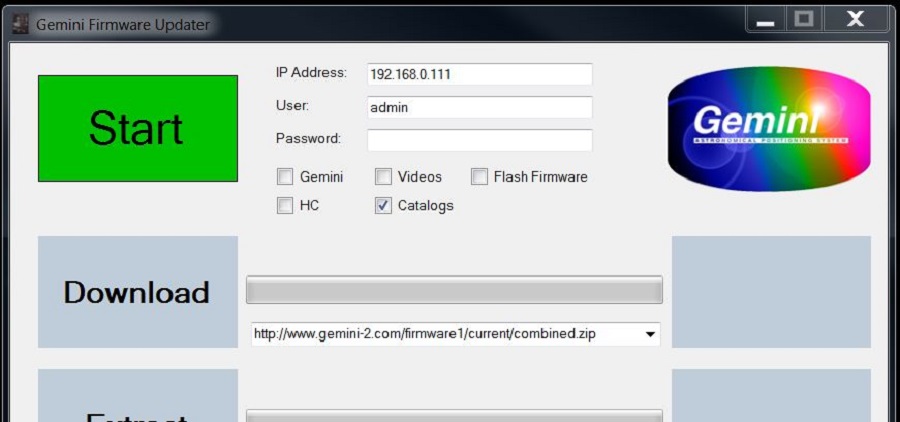
    7. Since the GFU program has now been releases, You can also try first formatting the the micro-SDcard in the hand controller and then use GFU to upload all new files.  You will how-ever have to have the hand controller partially working for this to work.  To format the micro-SDcard, go to Menu --> HC-->SDcard-->Format SDcard-->Select Yes.  Wait for the Format to finish.  Then open up GFU, on on the option boxes only check "HC" and "catalogs," leave Gemini and Flash unchecked.  Hit the Start button.  When the GFU routines stops, unplug the hand controller and then plug it back in.  It should start uploading all the hand controller files, which will take about 45 minutes or so.
  
4. How to Bench Test.
  1. I prefer to do bench testing with motors removed from the mount.  Now you can safely run the Gemini-2 or Gemini-1 without motors, but you can tell so much more with the motors connected.
    1. You can almost test all the functions of the Gemini-2 on the bench this way. Just about all of the pictures taken for this web site was done this way.
    2. Notice when first powering on, that the RA motor does not turn.  It only starts rotating after a boot mode is selected. (Assuming you are in parking mode 0, more on this later.)
    3. The RA motor turns CCW for GM-8 and G11.  It turns CW for HGM-200, Titan, Titan 50 and MI-250.  The speed is about 1 revolution in 10 seconds, but depends on the mount type.
  2. Testing the guider input:  If you have a Classic/Standard hand controller, this can be plugged into the Guider input jack.  You can use the DEC and RA button to then simulate Guider input signals.
    If you have a GPUSB from Shoestring Astronomy along with there GPUSBNudge program to do the same thing.
    1. RA buttons will cause the RA shaft to slow down with an -RA button and speed up with a +RA button.
    2. DEC buttons will cause the CW with Positive DEC (GM8 & G11) and CCW with negative DEC button (again GM8 & G11)  The other mounts will be opposite.
  3. Testing Hand Controller input. 
    1. The hand controller normally connects to the Serial Port 2 input jack.  The baud rate for the hand controller is always 57600 baud.  This can only be set using the Web interface using the Serial Ports tab.  Set Serial Port 2. 
    2. Will the hand controller work into Serial Port 1, Yes, but you must set the baud rate of that port to 57600.  Serial port 1 will default to 9600 baud after a firmware update, so having the hand controller connected to it is not the best idea.
  4. Testing Serial Port 1 for GPS connection. 
    1. Please see this page for using the Losmandy GPS or the Star GPS unit.
    2. Please note that the GPS does not update the TimeZone setting.  All GPS units only return UTC time.  The Gemini-2 then can take that time and the TimeZone value you have set using either the site menu or the TimeZone menu and display your local time.  If your Timezone is set wrong, then the Gemini-2 will calculate the local time wrong.  If you do not like to worry about daylight saving time changing the TimeZone requirements, then set the TimeZone to UTC which would be zero.  Enter UTC Time and Date manually or use a GPS unit.  The local time now will display the UTC time and date, and the G2 will be happy.  Make sure your Latitude and Longitude are correct.
    3. It is possible to simulate a GPS connection using programs such as GPS port director found under useful Programs. This program will allow a GPS connected to a PC to be redirected to a com port connected into the Gemini-2. Your PC is of course going to have to have 2 serial ports. Now one of these can be a USB style GPS unit (such as the ones that used to be supplied with Microsoft Streets and Maps.  There are also many cheap USB GPS units on the market.), where it's driver creates a virtual serial port. Most likely, you would have to use a USB to Serial adapter for the second serial port.
 
5. Back After Power Fail.
  1. Gemini has a voltage supervisor on board that is primarily used to save all important data (positional, date, time) at power-off. This is necessary to allow for permanent PEC and Warm (Re)Start.
  2. This supervisor triggers an interrupt if the voltage drops down below about 10V. All GoTo operations are stopped, motors are halted, Housekeeping is done, all files are closed.
  3. G2 then enters a loop and waits for browning out (power off) or for regaining power. If power comes back the message "Back after power fail" is displayed and normal operation can proceed.
 
6. ASCOM Driver won't connect:
  1. The ASCOM Gemini.net driver normally depends on what is called "NetBios Name Resolution" to find and connect to the Gemini-2 using Ethernet.  For this to work, several things have to be in place:
    1. See Configuring Ethernet ASCOM Driver and follow these steps to configure the ASCOM driver for Ethernet connection.
    2. NetBios Name Resolution has to be enabled on the system.  Enabling NetBios
    3. DHCP is also the normal default mode for setting the IP address.
      1. If you are connecting directly into a laptop wired connector (not using a router), you are probably using static IP addresses.
      2. It is possible to make Windows provide a DHCP address to the Gemini-2 using "Internet Connection Sharing (ICS)." The problem with this is that it normally makes the network after the Laptop a Public network, which limits things.  I am not going to get into how to configure ICS here, as this really depends on your Lan layout. Here are several links on how to do it for Win 7.
        1. Using ICS with Win 7.
        2. Set up a shared Internet connection using ICS
  2. The UPD ports that the ASCOM Gemini.net communicates through in the router have to be available and enabled.  This is a router setting, and they are normally open in most routers, and because there or thousands of different routers available, this cannot be covered here.
  3. The ports also must not be blocked by the Firewall.  If they are, then you will have to tell your firewall to allow them.
  4. If you try to install a newer version of the ASCOM Gemini.net driver, or try to uninstall the Gemini.net driver using the Control Panel and get an error message that some of the components are missing and the install or uninstall fails, then you are going to have to use a different program to try and remove the rest of the driver.  Paul, the writer of the ASCOM Gemini.net driver recommends trying VSRevo Group's Revo Uninstaller.  There is a free and paid ($39.25 for 1 computer) versions and portable ($69.25 for unlimited computers) versions here.
 
7. Low/Bad Battery Symptoms:
  1. The internal battery in the main Gemini 2 unit powers both the Real Time clock and the internal CMOS-RAM both of which are located inside the ARM processor that is the brains of the Gemini-2.  This battery is a CR2354, and the type of holder makes it a little difficult to replace in the Original Gemini-2. (CR2354 battery change video.) In the new Gemini-2 Mini the battery type is a CR2450 and is much easier to change. (CR2450 battery change video). There is no battery in the hand controller.   Symptoms of a low or dead battery:
    1. Not remember the site on power up,
    2. Comes up with the wrong time or date,
    3. Does not remember mount type,
    4. Model or PEC not remembered,
    5. GOTO's are erratic
    6. Forced Cold Start.
    7. There could be many other problems caused by this also.
  2. Replace this battery when the battery level scale shows it to be 2.75 volts or lower.  You find this reading on the Web interface under Battery, Ports tab. See web battery, ports as an example.
  3. IMPORTANT: As soon as you have replaced the battery, Please power on the Gemini-2 and set the time and date. If you don't it is possible that the ARM processor will try and draw a lot of power from the battery, and could cause internal damage.
  4. I suggest that if you have the original Gemini-2 you consider changing the battery holder to the one for the CR2450. You can get one from Mouser Electronics Part number 534-1053-BH It will fit in the same holes and space as the current battery holder. You might consider using ChipQuik SMD Removal kit which contains solder that stays molten long enough to easily remove the old holder very easy. I know, I used it to change to this battery holder on my own Gemini-2. Of course I should not have to say if you do this, you do it at your own risk. So you might want to get a TV or Computer repair shop to do it for you.
  5. To Remove the front panel requires a 1/16 inch Allen Wrench.  They can be ordered from Losmandy for  a small fee plus shipping.
 
8. Forced Cold Start:
  1. The internal battery in the main Gemini 2 unit powers both the Real Time clock and the internal CMOS-RAM both of which are located inside the ARM processor that is the brains of the Gemini-2.  This battery is a CR2354, and the type of holder makes it a little difficult to replace in the Original Gemini-2. (CR2354 battery change video.) In the new Gemini-2 Mini the battery type is a CR2450 and is much easier to change. (CR2450 battery change video). There is no battery in the hand controller.   Symptoms of a low or dead battery:
    1. Forced Cold Start. Also this can also happen on Gemini-1 systems as well.
    2. Not remember the site on power up,
    3. Comes up with the wrong time or date,
    4. Does not remember mount type,
    5. Model or PEC not remembered,
    6. GOTO's are erratic
    7. There could be many other problems caused by this also.
  2. Also there is a selection menu on the hand controller "Menu -->Startup -->Cold Start" that will force a startup in cold start.  Like wise, the Web interface also has this same selection. Also see at the bottom of page /web/web-mount.php for an example. It's normal selection is "Ask if Possible".  If you have your Gemini-2 connected via Ethernet, then http://gemini/mountpar.cgi will take you to the web interface page. You will have to log in.
 
9. Some Screens of HC not functioning after firmware update:
   If some or most of the screens in the hand controller are malfunction after a firmware update then the micro-SDcard in the hand controller is probably corrupt.  Do the following steps to try and recover and redo the hand controller.
  1. make sure the hand controller is plugged into the bottom Serial Port 2/Graphics HC connector.
  2. If you just updated the firmware, then the micro SDcard in the HC might have become corrupted. If this has happened, you might be able to recover by doing a format of the Micro-SDcard. 
    1. On the Hand Controller Main Screen, Select "Menu" => "HC" => "SD Card" => "Format SDcard" =>"Yes"  This will do an internal format of the micro-SDcard in the hand controller unit.
    2. Now we are going to use GFU firmware download program twice. So bring up the GFU program and make sure the IP address the location of the Download are correct.
    3. Now uncheck all the check boxes except HC.  Your GFU screen should look similar to this:

d. Hit the "Start" Button
e. and then let GFU go through Download, Extract, and Upload.
f. Now unplug the hand controller, and then plug it back in.  It should start uploading programs into the hand controller, and also flash itself.
g. Now we need to do the same thing except with the catalogs of the hand controller.
h. Open GFU back up and unselect all the checkboxes except catalogs.

i. Hit the "Start" Button, and then let GFU go through Download, Extract, and Upload
j. Again unplug the hand controller and plug it back in. It will start uploading all the catalogs to the hand controller from the main unit. The catalog files are large, and this can take an hour or so.
Removing Virus or Malicious Software: If you suspect that your Windows computer has a virus or Malicious Software, Microsoft has two tools that can help you get rid of it.
  1. Windows Defender Offline http://windows.microsoft.com/en-US/windows/what-is-windows-defender-offline
  2. Malicious Software Removal tool https://www.microsoft.com/en-us/download/details.aspx?id=9905

I suggest that you use custom scan and only scan one drive at a time.  If the scan does not complete you will loose the results of the scan.

 
10. Calibrating the Screen: If the screen changes languages when pushing on it, the the most probable cause is that the screen touchpad calibration is way off.  This is pretty easy to fix.  Just turn off the Gemini-2 and turn it back on while watching the Hand controller.  The second screen displayed will be the calibration screen.  You need to touch in the center of it, to start the calibration routine.  You have to be fast as this screen is only displayed for about 1 second if you do not touch it.  After touching it, it will give you three calibration points to touch, each on a separate screen.  I recommend using a stylus to do this. Then there will be a final screen that will go-away with a count down timer.  This should fix the problem.
 
11. Mount Rejecting stars:
    If your mount is rejecting stars telling you they are not reachable, please check these items.
  1. Make sure your Latitude, Longitude, and Timezone are set correctly.
    See site menu.  On HC, Menu-->Site
  2. Make sure you Local and UTC times are showing correctly on the Web interface.
    See Site/Time on the Web interface.
  3. Make sure that your mount type is selected correctly,
    See mount type menu. On HC, Menu-->Mount-->Type
  4. Make sure your limits are set correctly. See Limits.
  5. If you have just done a firmware upgrade, Please make sure you have done a SRAM Reset at the bottom of the Web interface page Firmware/SRAM. 
  6. Make sure your battery is good.  See Low Battery Symptoms
  7. If all the above is correct, and the mount still rejects stars, Please try entering your time and date as UTC, and set the time offset to ZERO
 
12. DEC or RA misbehaving:
    If your mount DEC or RA misbehaving, please check these items.
  1. That the motor cables are in the correct place. The DEC is the TOP motor. Don't feel bad if you get them backward. It happens all the time.
  2. DEC or RA not moving, Getting a STALL message.  This indicates that you probably have one of 3 things wrong.
    1. You have a bad motor cable.
    2. You have a bad motor. This has many indications, some of them very strange.
      1. If the motor still turns, but seems to go twice as far as it should, then the encoder is bad.  This is a very rare case but does happen. (it indicates only one of the encoder sensors is working. This provides only half the pulses it should, so the motor has to turn twice as far to satisfy the Gemini-2 encoder count.)
      2. If the motor starts off spinning at high speed, the encoder is probably bad.  This happens most often. (if the Gemini-2 receives no encoder pulses it commands more current to the motor. That makes the motor start spinning wildly.  Sometime a DEC motor will only do this when commanded to move.)
      3. If the motor will not move and you are getting STALL warning, then the motor winding, or connector might have gone bad.
    3. The internal driver inside the Gemini has gone bad.
  3. DEC or RA not moving, but no STALL message.  Check that the OLDHAM coupler is not slipping on the worm shaft.  It is between the worm and gearbox.
 
13. Motor Stall Faults:
    If your mount RA or DEC is having motor stall faults, here is a couple of suggestions.
  1. Ensure the power supply is sufficient in voltage and amperage. Many forum posters recommend at least 15V and 4-5 Amps minimum, and so do I.
  2.  Use slower slewing speeds with 12V supplies.  If you are using only a 12V power source and have the stall faults.  Lowered the slewing speeds to 500 for RA and DEC and see if this clears the .
14. Ethernet Problems:
    If you are using an USB to Ethernet adapter.
  1. Ensure that the computers Advanced Power setting: "USB selective suspend setting" is set to disabled.  See Image. See image.
  2. Make sure the drivers you are using is the latest.
Teamviewer Quick Support download